astro 语法#
.astro 是增强版 HTML - 可以写逻辑、导入组件、自动优化,但最终生成纯 HTML
---// .astro 文件 - 多了这些// 1. 代码块(运行在服务端)const name = 'World'const users = ['Alice', 'Bob', 'Charlie']---
<!-- 2. 模板语法 - 可以嵌入 JavaScript 表达式 --><h1>Hello {name}</h1>
<!-- 3. 动态渲染列表 --><ul>  {users.map(user => <li>{user}</li>)}</ul>
<!-- 4. 条件渲染 -->{users.length > 0 ? (  <p>有 {users.length} 个用户</p>) : (  <p>暂无用户</p>)}
<!-- 5. 导入其他组件 --><NavBar />
<!-- 6. 作用域样式 --><style>  /* 这个样式只影响本组件 */  h1 { color: red; }</style>
<!-- 7. 客户端脚本 --><script>  console.log('运行在浏览器')</script>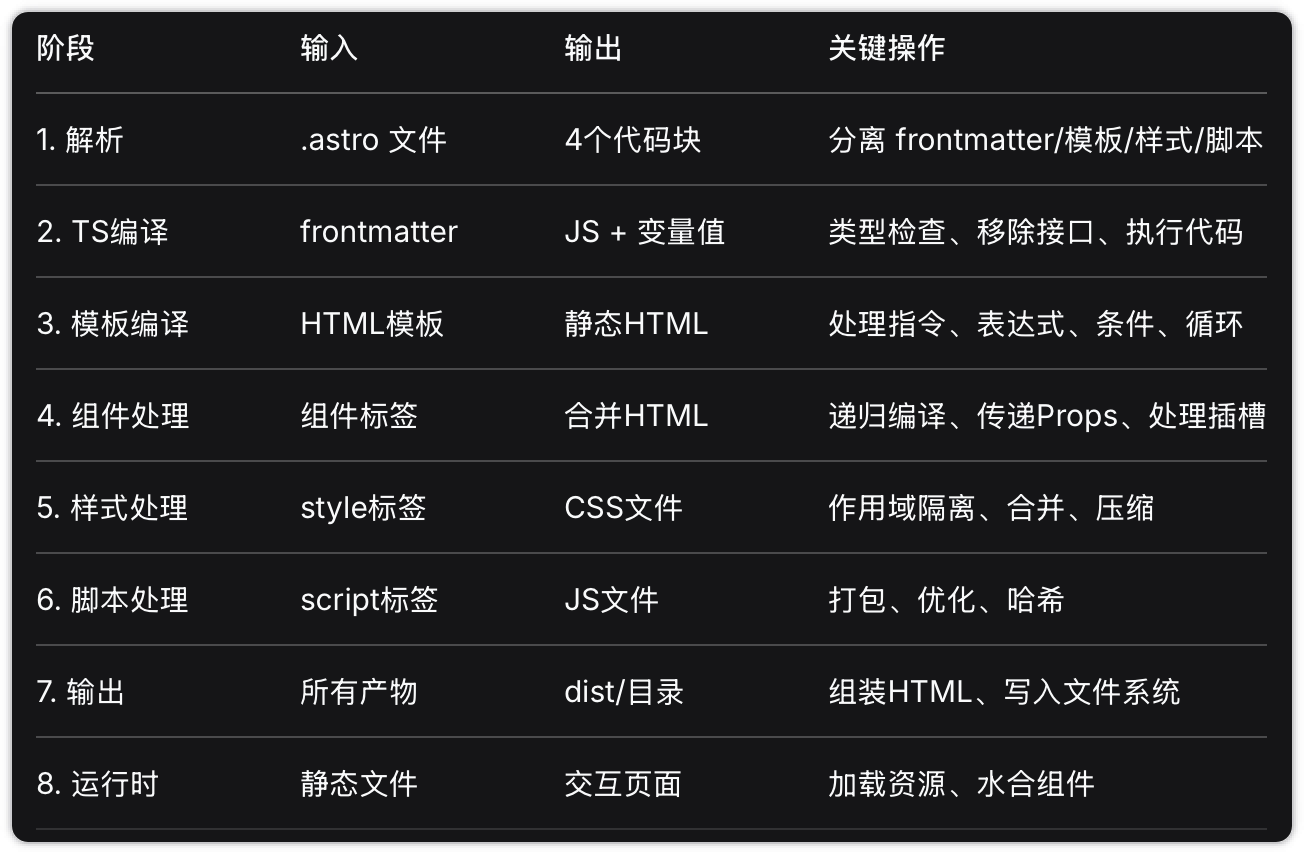
┌─────────────────────────────────────────────────────────────────────────────┐│ 阶段 0:源代码输入 │├─────────────────────────────────────────────────────────────────────────────┤│ ││ Button.astro ││ ┌─────────────────────────────────────────┐ ││ │ --- │ ││ │ import Base from './Base.astro' │ ││ │ interface Props { variant?: string } │ ││ │ const { variant = 'primary' } = Astro.props ││ │ --- │ ││ │ <button class:active={true}>Click</button> ││ │ <style>.btn { color: red; }</style> │ ││ └─────────────────────────────────────────┘ ││ │└─────────────────────────────────────────────────────────────────────────────┘ │ ▼┌─────────────────────────────────────────────────────────────────────────────┐│ 阶段 1:文件解析 │├─────────────────────────────────────────────────────────────────────────────┤│ ││ Astro 编译器读取 .astro 文件,识别四个部分: ││ ││ ┌──────────────────┐ ││ │ 1. Frontmatter │ --- ... --- (组件脚本,服务端执行) ││ ├──────────────────┤ ││ │ 2. HTML 模板 │ <button>...</button> (UI 模板) ││ ├──────────────────┤ ││ │ 3. Style 块 │ <style>...</style> (组件样式) ││ ├──────────────────┤ ││ │ 4. Script 块 │ <script>...</script> (客户端脚本) ││ └──────────────────┘ ││ │└─────────────────────────────────────────────────────────────────────────────┘ │ ▼┌─────────────────────────────────────────────────────────────────────────────┐│ 阶段 2:TypeScript 编译(Frontmatter 处理) │├─────────────────────────────────────────────────────────────────────────────┤│ ││ ┌─────────────────────────────────────────────────────────────────────┐ ││ │ 步骤 2.1:识别代码类型 │ ││ │ │ ││ │ interface Props { variant?: string } → 类型定义 │ ││ │ import Base from './Base.astro' → 实际代码 │ ││ │ const { variant } = Astro.props → 实际代码 │ ││ └─────────────────────────────────────────────────────────────────────┘ ││ │ ││ ▼ ││ ┌─────────────────────────────────────────────────────────────────────┐ ││ │ 步骤 2.2:类型检查 │ ││ │ │ ││ │ TypeScript 检查 interface 定义是否正确 │ ││ │ • variant 类型是否匹配? │ ││ │ • 导入的模块是否存在? │ ││ │ │ ││ │ ✅ 通过 → 继续 │ ││ │ ❌ 失败 → 报错,停止构建 │ ││ └─────────────────────────────────────────────────────────────────────┘ ││ │ ││ ▼ ││ ┌─────────────────────────────────────────────────────────────────────┐ ││ │ 步骤 2.3:编译转换 │ ││ │ │ ││ │ 移除所有类型定义(interface/type) │ ││ │ 将 TypeScript 语法编译为 JavaScript │ ││ │ 执行代码,收集: │ ││ │ • Props 定义 │ ││ │ • 组件需要接收哪些 Props? │ ││ │ • 哪些 Props 有默认值? │ ││ │ • 变量值(如 variant = 'primary') │ ││ │ │ ││ │ 输出:JavaScript 逻辑代码 │ ││ └─────────────────────────────────────────────────────────────────────┘ ││ │└─────────────────────────────────────────────────────────────────────────────┘ │ ▼┌─────────────────────────────────────────────────────────────────────────────┐│ 阶段 3:模板编译(HTML 模板处理) │├─────────────────────────────────────────────────────────────────────────────┤│ ││ 遍历 HTML 模板,识别并处理以下语法: ││ ││ ┌─────────────────────────────────────────────────────────────────────┐ ││ │ 类型 A:Astro 指令 │ ││ ├─────────────────────────────────────────────────────────────────────┤ ││ │ │ ││ │ A1. class:list │ ││ │ <div class:list={['base', isActive && 'active']}> │ ││ │ → 计算数组:['base', true && 'active'] → ['base', 'active'] │ ││ │ → 生成:<div class="base active"> │ ││ │ │ ││ │ A2. set:html / set:text │ ││ │ <div set:html={htmlString} /> │ ││ │ → 验证 HTML 安全性 │ ││ │ → 直接插入 HTML 字符串 │ ││ │ │ ││ │ A3. client:*(客户端指令) │ ││ │ <Interactive client:load /> │ ││ │ → 标记为需要客户端激活 │ ││ │ → 生成占位符 <astro-island> │ ││ │ → 记录组件路径和 Props │ ││ │ │ ││ │ A4. transition:*(视图过渡) │ ││ │ <div transition:name="hero"> │ ││ │ → 添加视图过渡标记 │ ││ └─────────────────────────────────────────────────────────────────────┘ ││ ││ ┌─────────────────────────────────────────────────────────────────────┐ ││ │ 类型 B:JavaScript 表达式 │ ││ ├─────────────────────────────────────────────────────────────────────┤ ││ │ │ ││ │ B1. 变量插值 {variable} │ ││ │ <h1>{title}</h1> │ ││ │ → 替换为变量的值 │ ││ │ │ ││ │ B2. 条件渲染 {condition && <div />} │ ││ │ {isLoggedIn && <span>欢迎</span>} │ ││ │ → isLoggedIn = true → 保留 <span> │ ││ │ → isLoggedIn = false → 完全删除 │ ││ │ │ ││ │ B3. 三元表达式 {cond ? A : B} │ ││ │ {user ? <div>A</div> : <div>B</div>} │ ││ │ → 根据条件只保留一个分支 │ ││ │ │ ││ │ B4. 数组循环 {arr.map(item => <li>{item}</li>)} │ ││ │ {['A','B'].map(i => <li>{i}</li>)} │ ││ │ → 展开为 <li>A</li><li>B</li> │ ││ └─────────────────────────────────────────────────────────────────────┘ ││ ││ 输出:处理后的 HTML 字符串 ││ │└─────────────────────────────────────────────────────────────────────────────┘ │ ▼┌─────────────────────────────────────────────────────────────────────────────┐│ 阶段 4:组件系统处理 │├─────────────────────────────────────────────────────────────────────────────┤│ ││ ┌─────────────────────────────────────────────────────────────────────┐ ││ │ 步骤 4.1:识别组件标签 │ ││ │ │ ││ │ <BaseButton variant="primary">Click</BaseButton> │ ││ │ │ ││ │ 判断类型: │ ││ │ • HTML 内置标签 (<div>, <span>) → 直接输出 │ ││ │ • Astro 组件 (<BaseButton>) → 递归编译 │ ││ │ • 框架组件 (<ReactButton />) → 特殊处理 │ ││ └─────────────────────────────────────────────────────────────────────┘ ││ │ ││ ▼ ││ ┌─────────────────────────────────────────────────────────────────────┐ ││ │ 步骤 4.2:处理 Astro 组件 │ ││ │ │ ││ │ 子组件 = 递归执行阶段 1-3 │ ││ │ │ ││ │ ┌─────────────────────────────────────────────────────────────┐ │ ││ │ │ 1. 读取 BaseButton.astro │ │ ││ │ │ 2. 编译其 Frontmatter │ │ ││ │ │ 3. 编译其模板 │ │ ││ │ │ 4. 接收 Props { variant: 'primary' } │ │ ││ │ │ 5. 处理 children 'Click' │ │ ││ │ │ 6. 返回生成的 HTML │ │ ││ │ └─────────────────────────────────────────────────────────────┘ │ ││ │ │ ││ │ 合并子组件 HTML 到父组件 │ ││ └─────────────────────────────────────────────────────────────────────┘ ││ │ ││ ▼ ││ ┌─────────────────────────────────────────────────────────────────────┐ ││ │ 步骤 4.3:处理框架组件(React/Vue/Svelte) │ ││ │ │ ││ │ <ReactButton onClick={handleClick}>Click</ReactButton> │ ││ │ │ ││ │ • 提取 Props 和 children │ ││ │ • 生成包装器 HTML:<astro-island> │ ││ │ • 序列化 Props 为 JSON │ ││ │ • 记录需要客户端水合 │ ││ │ • 等待后续生成 JS 入口文件 │ ││ └─────────────────────────────────────────────────────────────────────┘ ││ │└─────────────────────────────────────────────────────────────────────────────┘ │ ▼┌─────────────────────────────────────────────────────────────────────────────┐│ 阶段 5:样式处理 │├─────────────────────────────────────────────────────────────────────────────┤│ ││ 收集所有 <style> 标签,分类处理: ││ ││ ┌─────────────────────────────────────────────────────────────────────┐ ││ │ 类型 1:普通样式(默认作用域) │ ││ │ │ ││ │ <style> │ ││ │ .btn { color: red; } │ ││ │ </style> │ ││ │ │ ││ │ → 生成唯一 ID:data-astro-abc123 │ ││ │ → 重写选择器:.btn[data-astro-abc123] { color: red; } │ ││ │ → 给对应 HTML 添加属性 │ ││ │ │ ││ └─────────────────────────────────────────────────────────────────────┘ ││ ││ ┌─────────────────────────────────────────────────────────────────────┐ ││ │ 类型 2:内联样式(<style is:inline>) │ ││ │ │ ││ │ → 保持原样,不添加作用域 │ ││ │ → 原样输出到 HTML 中 │ ││ │ │ ││ └─────────────────────────────────────────────────────────────────────┘ ││ ││ ┌─────────────────────────────────────────────────────────────────────┐ ││ │ 类型 3:全局样式(src/styles/) │ ││ │ │ ││ │ → 不添加作用域 │ ││ │ → 提取到独立 CSS 文件 │ ││ │ │ ││ └─────────────────────────────────────────────────────────────────────┘ ││ ││ 生产模式额外处理: ││ • 合并相同组件的样式 ││ • 压缩 CSS(移除空格、注释) ││ • 添加浏览器前缀 ││ • 生成独立 .css 文件,添加哈希(如 Button.a1b2c3.css) ││ │└─────────────────────────────────────────────────────────────────────────────┘ │ ▼┌─────────────────────────────────────────────────────────────────────────────┐│ 阶段 6:脚本处理 │├─────────────────────────────────────────────────────────────────────────────┤│ ││ 收集所有 <script> 标签,分类处理: ││ ││ ┌─────────────────────────────────────────────────────────────────────┐ ││ │ 类型 1:普通脚本 │ ││ │ │ ││ │ <script> │ ││ │ console.log('hello') │ ││ │ </script> │ ││ │ │ ││ │ → 提取内容到独立文件 │ ││ │ → 添加 type="module" │ ││ │ → 处理 import 语句 │ ││ │ → 生产模式:压缩、Tree Shaking │ ││ │ → 输出:/_astro/button.xyz789.js │ ││ │ │ ││ └─────────────────────────────────────────────────────────────────────┘ ││ ││ ┌─────────────────────────────────────────────────────────────────────┐ ││ │ 类型 2:内联脚本(<script is:inline>) │ ││ │ │ ││ │ → 保持原样,不提取 │ ││ │ → 原样输出到 HTML 中 │ ││ │ │ ││ └─────────────────────────────────────────────────────────────────────┘ ││ ││ ┌─────────────────────────────────────────────────────────────────────┐ ││ │ 类型 3:框架组件脚本(React/Vue) │ ││ │ │ ││ │ → 生成组件入口文件 │ ││ │ → 包含水合逻辑 │ ││ │ → 输出:/_astro/Component.hash.js │ ││ │ │ ││ └─────────────────────────────────────────────────────────────────────┘ ││ │└─────────────────────────────────────────────────────────────────────────────┘ │ ▼┌─────────────────────────────────────────────────────────────────────────────┐│ 阶段 7:最终输出 │├─────────────────────────────────────────────────────────────────────────────┤│ ││ 组装所有编译产物: ││ ││ ┌─────────────────────────────────────────────────────────────────────┐ ││ │ 最终 HTML 文件 │ ││ │ │ ││ │ <!DOCTYPE html> │ ││ │ <html> │ ││ │ <head> │ ││ │ <!-- 样式链接 --> │ ││ │ <link rel="stylesheet" href="/_astro/button.a1b2c3.css"> │ ││ │ </head> │ ││ │ <body> │ ││ │ <!-- 组件 HTML --> │ ││ │ <button class="btn btn-primary" data-astro-abc123> │ ││ │ 点击 │ ││ │ </button> │ ││ │ │ ││ │ <!-- 框架组件占位符 --> │ ││ │ <astro-island data-props="..."></astro-island> │ ││ │ │ ││ │ <!-- 脚本链接 --> │ ││ │ <script type="module" src="/_astro/button.xyz789.js"></script>│ ││ │ </body> │ ││ │ </html> │ ││ │ │ ││ └─────────────────────────────────────────────────────────────────────┘ ││ ││ dist/ 目录结构: ││ ┌─────────────────────────────────────────────────────────────────────┐ ││ │ dist/ │ ││ │ ├── index.html # 页面 HTML │ ││ │ ├── about.html │ ││ │ ├── _astro/ # 优化后的资源 │ ││ │ │ ├── button.a1b2c3.css # 样式文件 │ ││ │ │ ├── button.xyz789.js # 脚本文件 │ ││ │ │ ├── logo.abc123.webp # 优化后的图片 │ ││ │ │ └── chunk.xxx.js # 公共代码块 │ ││ │ └── public/ # 静态资源 │ ││ │ └── favicon.svg │ ││ └─────────────────────────────────────────────────────────────────────┘ ││ │└─────────────────────────────────────────────────────────────────────────────┘ │ ▼┌─────────────────────────────────────────────────────────────────────────────┐│ 阶段 8:浏览器运行时 │├─────────────────────────────────────────────────────────────────────────────┤│ ││ ┌─────────────────────────────────────────────────────────────────────┐ ││ │ 步骤 8.1:加载页面 │ ││ │ │ ││ │ 浏览器请求 → 服务器返回 HTML → 解析 DOM │ ││ │ │ ││ └─────────────────────────────────────────────────────────────────────┘ ││ │ ││ ▼ ││ ┌─────────────────────────────────────────────────────────────────────┐ ││ │ 步骤 8.2:加载资源 │ ││ │ │ ││ │ • 并行加载 CSS 文件 │ ││ │ • 并行加载 JS 文件 │ ││ │ • 加载图片等静态资源 │ ││ │ │ ││ └─────────────────────────────────────────────────────────────────────┘ ││ │ ││ ▼ ││ ┌─────────────────────────────────────────────────────────────────────┐ ││ │ 步骤 8.3:执行脚本 │ ││ │ │ ││ │ • 执行普通 JS 脚本 │ ││ │ • 水合框架组件: │ ││ │ - 扫描 <astro-island> 占位符 │ ││ │ - 加载对应的组件 JS │ ││ │ - 激活组件(绑定事件、状态等) │ ││ │ │ ││ └─────────────────────────────────────────────────────────────────────┘ ││ │ ││ ▼ ││ ┌─────────────────────────────────────────────────────────────────────┐ ││ │ 最终结果 │ ││ │ │ ││ │ 用户看到完整页面,可交互 │ ││ │ SEO 搜索引擎看到完整 HTML 内容 │ ││ │ │ ││ └─────────────────────────────────────────────────────────────────────┘ ││ │└─────────────────────────────────────────────────────────────────────────────┘| 运行环境 | 位置 | 能做什么 | 不能做什么 |
|---|---|---|---|
| 服务端(Astro 组件脚本) | 构建时的 Node.js | 读文件、访问数据库、调用 API、导入模块 | 访问 window、document、localStorage |
| 客户端(浏览器) | 用户的浏览器 | DOM 操作、事件监听、用户交互 | 读服务器文件、访问环境变量 |
核心增强#
一、组件化#
组件化 = 可复用的 UI 片段 + 封装的状态和样式
1、Props 传递机制#
interface 是 TypeScript 的类型系统,不是 JavaScript 语法。只在编译时运行(类型检查),运行时完全消失
Props 让 Astro 组件像函数一样可组合,父组件通过属性传参,子组件通过 Astro.props 接收,构建时生成最终的 HTML
---// 1. 定义组件 Props 类型interface Props {  title: string  onClick?: () => void}
// 2. 使用类型const { title, onClick } = Astro.props
// 3. 类型守卫(编译时)if (typeof onClick === 'function') {  // 运行时检查,不是类型检查}---
<!-- 4. 模板中使用 --><h1>{title}</h1>
案例1:博客文章卡片
---interface Props {  title: string  excerpt: string  date: Date  tags: string[]  coverImage?: string  readingTime: number}
const {  title,  excerpt,  date,  tags,  coverImage,  readingTime} = Astro.props---
<article class="post-card">  {coverImage && (    <img src={coverImage} alt={title} class="cover" />  )}
  <div class="content">    <h2>{title}</h2>    <p class="excerpt">{excerpt}</p>
    <div class="meta">      <time datetime={date.toISOString()}>        {date.toLocaleDateString('zh-CN')}      </time>      <span class="reading-time">{readingTime} 分钟阅读</span>    </div>
<div class="tags"> {tags.map(tag => ( <span class="tag">{tag}</span> ))} </div> </div></article>---// 在列表页使用import PostCard from '../components/PostCard.astro'
const posts = await getCollection('blogs')---
<div class="posts-grid"> {posts.map(post => ( <PostCard title={post.data.title} excerpt={post.data.description} date={post.data.pubDate} tags={post.data.tags} coverImage={post.data.cover?.src} readingTime={post.data.minutesRead} /> ))}</div>案例2:多层传递
---// Level1.astro - 顶层组件import Level2 from './Level2.astro'
const userData = {  name: '李四',  level: 'gold',  points: 1500}---
<Level2 user={userData} />---// Level2.astro - 中间组件import Level3 from './Level3.astro'
const { user } = Astro.props---
<div> <h2>用户:{user.name}</h2> <Level3 user={user} /></div>---// Level3.astro - 底层组件const { user } = Astro.props---
<div class="user-detail"> <p>等级:{user.level}</p> <p>积分:{user.points}</p></div>2、样式封装#
<style>  /* 这个样式只会影响当前组件 */  .btn {    padding: 0.5rem 1rem;    border-radius: 0.25rem;  }
  .btn-primary {    background: blue;    color: white;  }</style>
编译后:
<!-- Astro 自动添加唯一属性 --><style>  .btn[data-astro-abc123] { ... }  .btn-primary[data-astro-abc123] { ... }</style>
<button class="btn btn-primary" data-astro-abc123> 点击我</button>3、组件嵌套#
---// Card.astro - 使用 Button 组件import Button from './Button.astro'
const { title } = Astro.props---
<div class="card"> <h3>{title}</h3> <p><slot /></p> <Button variant="primary">确认</Button> <Button variant="secondary">取消</Button></div>二、插槽系统#
插槽 = 占位符,让父组件可以”注入”内容到子组件的指定位置

1、默认插槽(任意内容)#
------
<div class="layout">  <header>    <slot name="header" />  <!-- 只接收 slot="header" 的内容 -->  </header>
  <main>    <slot />  <!-- 接收没有 name 的内容 -->  </main>
  <footer>    <slot name="footer" />  <!-- 只接收 slot="footer" 的内容 -->  </footer></div>
// 使用 Layout<Layout> <div slot="header">导航栏</div>
<article>主要内容</article> <!-- 自动进入默认 slot -->
<div slot="footer">版权信息</div></Layout>2、具名插槽(命名区域)#
------
<div class="doc-layout">  <!-- 定义多个命名区域 -->  <aside>    <slot name="sidebar" />  <!-- 侧边栏区域 -->  </aside>
  <main>    <slot name="before-content" />  <!-- 内容前区域 -->    <slot />                         <!-- 主要内容区域 -->    <slot name="after-content" />   <!-- 内容后区域 -->  </main>
  <div class="extra">    <slot name="footer-extra" />    <!-- 额外区域 -->  </div></div>
// 使用 - 可以填充各种区域<Documentation> <!-- ✅ 填充定义的侧边栏 --> <div slot="sidebar"> <ul>目录</ul> </div>
<!-- ✅ 填充内容前区域 --> <div slot="before-content"> <div class="notice">提示信息</div> </div>
<!-- ✅ 默认插槽 - 主要内容 --> <h1>文档标题</h1> <p>文档内容...</p>
<!-- ✅ 填充内容后区域 --> <div slot="after-content"> <div class="share">分享组件</div> </div>
<!-- ✅ 填充额外区域 --> <div slot="footer-extra"> <div class="related">相关文章</div> </div></Documentation>三、模版指令#
模板指令 = 编译时的 DOM 操作标记,构建时转化为静态 HTML
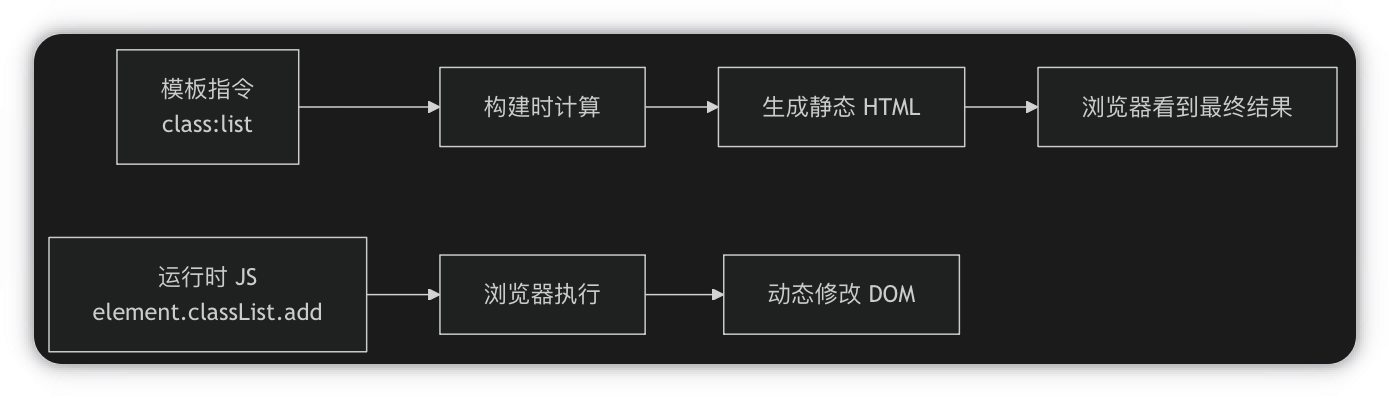
Astro 指令最终都会被编译成纯 HTML(以及可选的客户端 JavaScript),这就是 Astro”零 JS 默认”的核心原理。这些指令是 Astro 团队预先实现的,就像 Vue 的 v-if、React 的 className 一样
唯一会产生 JS 的指令:client:load 等客户端指令
| 指令 | 作用 | 示例 |
|---|---|---|
class:list | 动态类名列表 | class:list={['base', active && 'active']} |
class:value | 条件类名 | class:active={isActive} |
set:html | 设置 innerHTML | set:html={htmlString} |
set:text | 设置 textContent | set:text={textString} |
is:inline | 禁用组件包装 | <style is:inline> |
client:load | 客户端加载组件 | <Component client:load /> |
client:visible | 可见时加载 | <Component client:visible /> |
client:idle | 空闲时加载 | <Component client:idle /> |
client:media | 媒体查询匹配时加载 | <Component client:media="(max-width: 768px)" /> |
transition:name | 视图过渡动画 | <div transition:name="hero"> |
transition:animate | 自定义过渡动画 | <div transition:animate="slide"> |
指令的编译过程:
// 1. 源代码const condition = trueconst result = <div class:active={condition}>内容</div>
// 2. Astro 编译时执行// condition = true 被计算
// 3. 生成 HTML`<div class="active">内容</div>`
// 4. 最终输出(无任何运行时痕迹)四、布局支持#
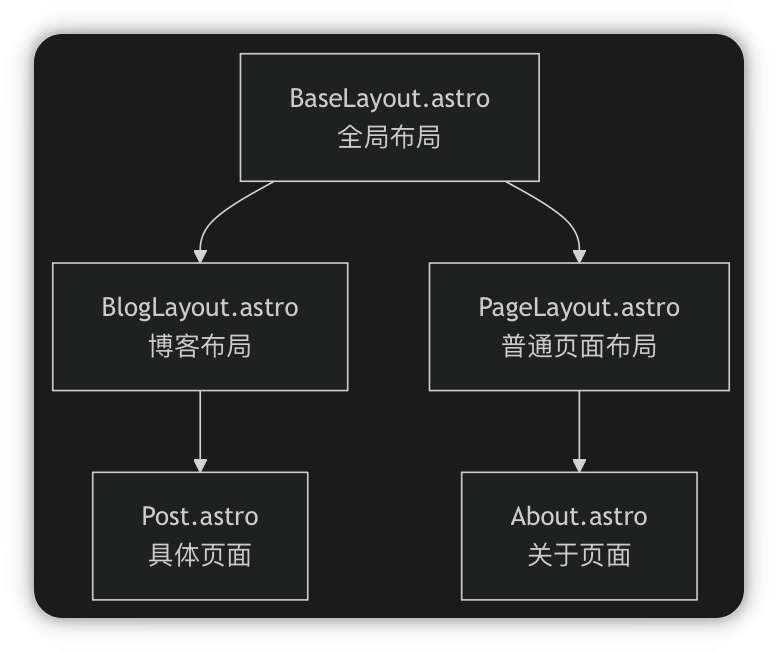
布局 = 页面包装器,提供一致的页面结构
Astro 博客开发流程#
-
构思内容结构
- 首页、文章列表、关于页、标签页
-
创建 Astro 项目(使用官方博客模板)
Terminal window npm create astro@latest -- --template blog -
编写布局(Layout)
src/layouts/BlogLayout.astro– 包含<header>、<main>、<footer> -
添加 Markdown 文章
src/content/posts/第一篇.md---title: '我的第一篇博客'pubDate: 2025-01-01---这里是内容... -
编写动态路由(自动生成每篇文章的页面)
src/pages/posts/[...slug].astro– 读取 Markdown 并渲染 -
添加交互(可选)
- 比如:评论区(React 组件 +
client:load) - 比如:图片灯箱(Vue 组件 +
client:visible)
- 比如:评论区(React 组件 +
-
优化和构建
Terminal window npm run build # 输出到 dist/ -
部署(可免费托管到 Netlify、Vercel、Cloudflare Pages)