MCP & Function Calling#
MCP 和 Function Calling 是完全不同层面的东西。
1、MCP 是一个系统架构层面的协议标准。提供一种 LLM 与外部工具、数据源之间的标准化连接方式,通信格式遵循 JSON-RPC 2.0
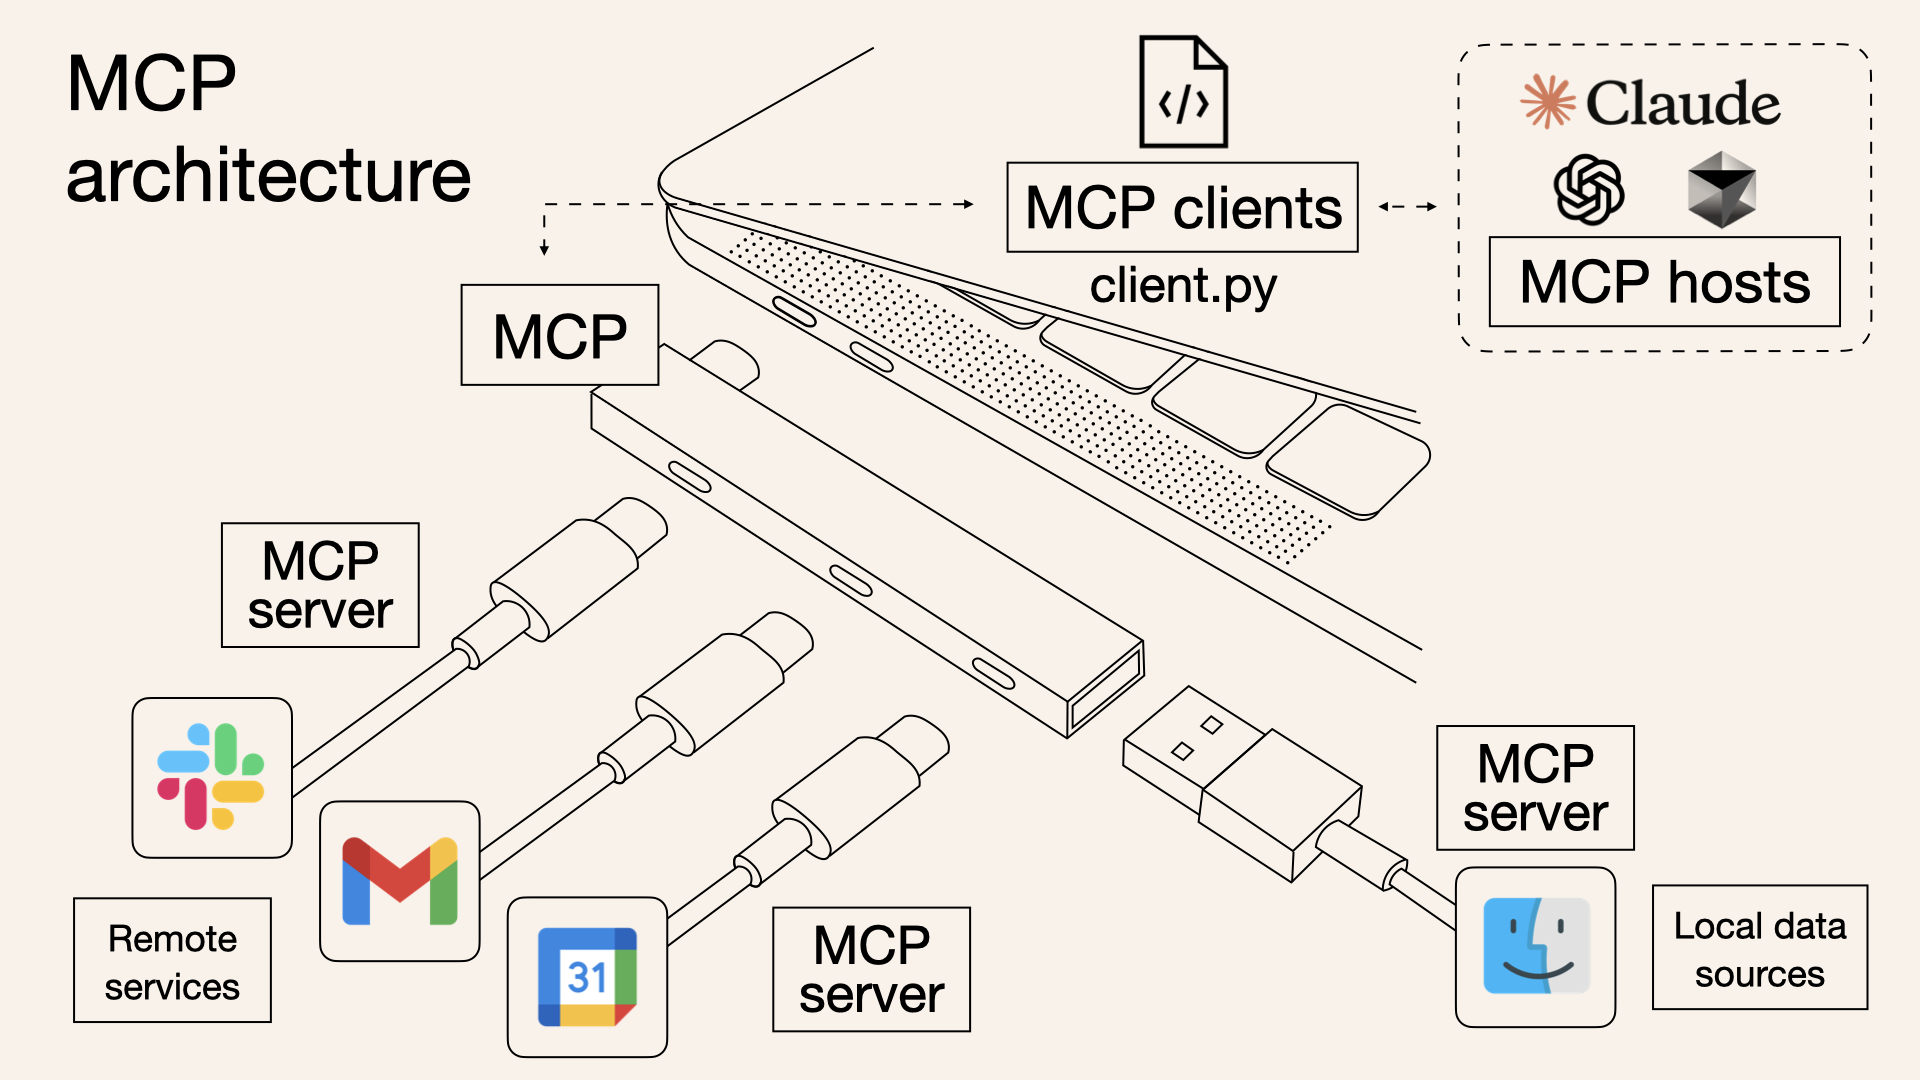
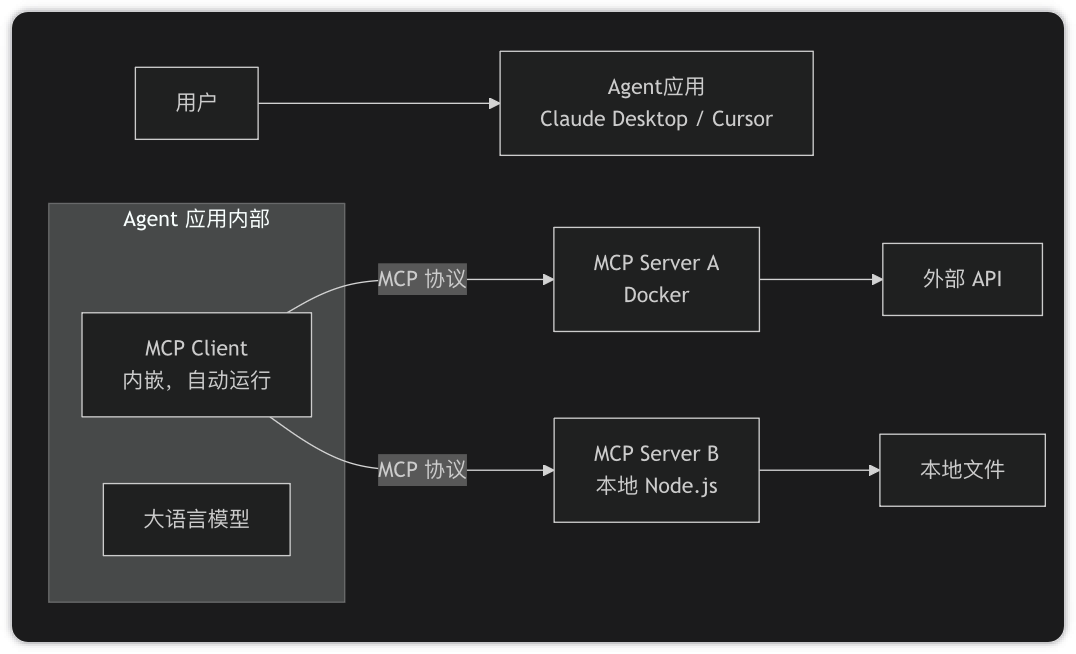
MCP 采用了非常经典的 C/S 架构(客户端/服务器),主要包括三个部分:
- 主机(Host): 一般是基于大模型的 AI 应用,比如 Claude Desktop、ChatGPT Desktop、Cursor 等桌面应用,需要访问外部数据或工具;
- 客户端(Client):内置在应用中,与 MCP 服务器建立一对一的连接;
- 服务器(Server):连接本地或远程的数据源,提供特定功能;
- 本地数据源:文件或数据库;
- 远程服务:外部 API 或互联网服务;
核心价值是标准化:新工具或新数据源只要按协议开发一次接口,就能被多个模型调用,不用给每个模型单独适配
MCP 的三件套让这种交互变得标准化:
| 问题 | 传统做法 | MCP 标准化做法 |
|---|---|---|
| AI 要读数据 | 开发者手动集成数据源 | 数据被封装成 Resource,AI 通过 URI 读取 |
| AI 要执行操作 | 开发者手动实现 API 调用 | 操作被封装成 Tool,AI 通过参数调用 |
| AI 要用好的提示词 | 开发者手动拼接提示词 | 模板被封装成 Prompt,AI 填入参数即可 |
- 传统 RAG(检索增强生成)主要处理非结构化文本(PDF、文档、知识库),适合稳定数据;动态数据需频繁重建索引,成本高
- MCP Resources 可处理结构化数据(JSON、数据库行、API返回结果),直接查询实时数据,天然支持高动态场景
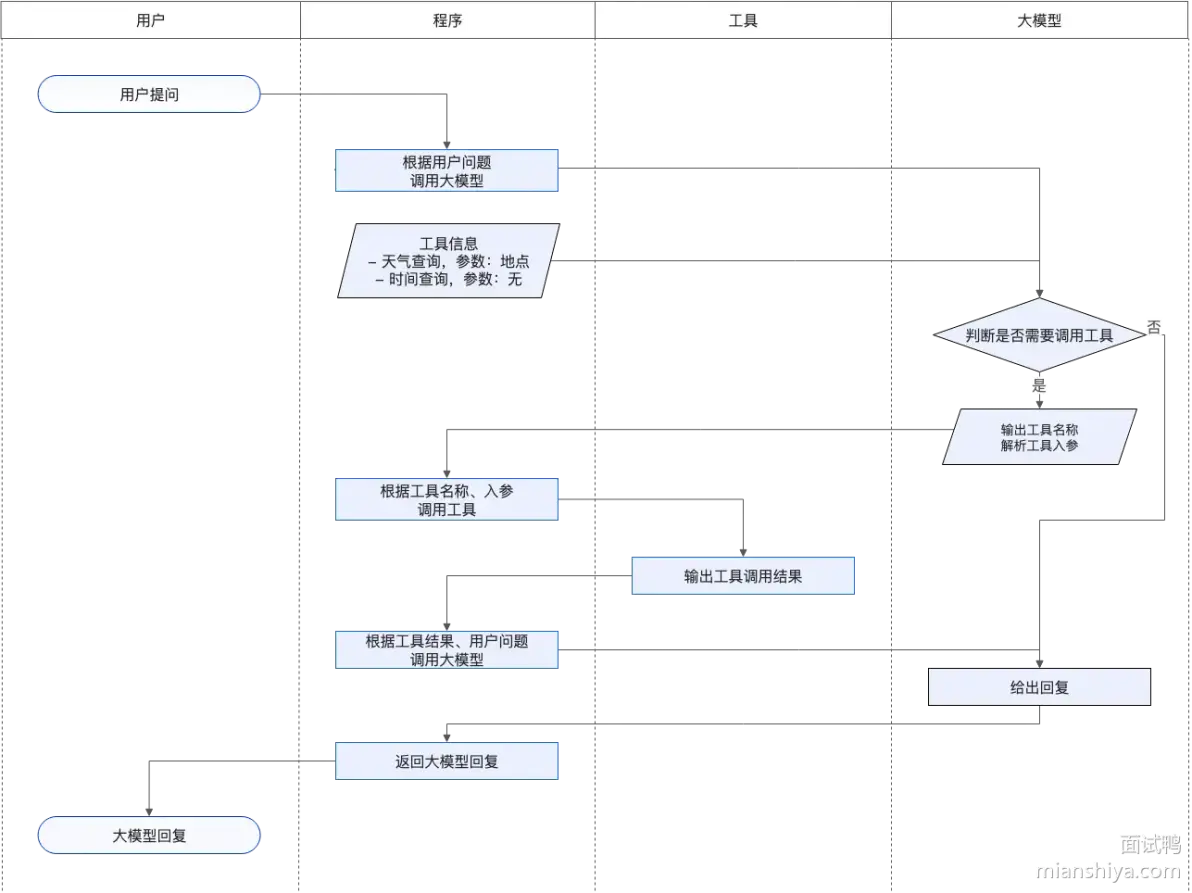
2、Function Calling 是大模型层面内置的能力。让模型能根据上下文产出结构化的函数调用请求,调用预定义的外部函数,扩展模型的实际操作能力。但它不要求消息是 JSON-RPC 格式,也不遵守 MCP 的上下文管理方式,是各家厂商自己定义的调用机制。
3、在实际项目里,MCP 和 Function Calling 配合使用
-
工具注册:开发者将外部服务封装成符合 MCP 规范的工具,并“注册”到 MCP 服务器上。服务器成为工具的“注册表”。
-
工具发现:MCP Client 启动后,会连接到一个或多个 MCP Server,获取其提供的 Tools 列表。
-
协议转换:MCP Client 会将这些 Tools 的描述、参数等信息,转换成目标 LLM 能够理解的特定格式注入 Agent。例如,OpenAI 的 LLM 需要 Function Calling 格式,而 Claude 的 LLM 可能使用另一种 API 格式。这步转换是 MCP Client 的关键能力,它充当了“翻译官”。
注入方式分两种:
- 结构化注入:放入 Chat Completions API 的
tools参数(这属于系统级上下文,比用户消息优先级高) - 文本化注入(针对非函数调用模型):将工具描述写成文本,拼接到 System Prompt 中(例如 ReAct 风格的“你有以下工具…”)
- 结构化注入:放入 Chat Completions API 的
-
决策与执行:
- 当用户在 Host 界面(如 Cursor)提问时,LLM 会看到这些“翻译”后的 Tools。
- LLM 根据用户问题决定调用哪个 Tool,并生成一个结构化的调用请求(即 Function Call)。
- MCP Client 接收到这个请求,将其转换回 MCP 标准协议,并转发给对应的 MCP Server 去执行。
-
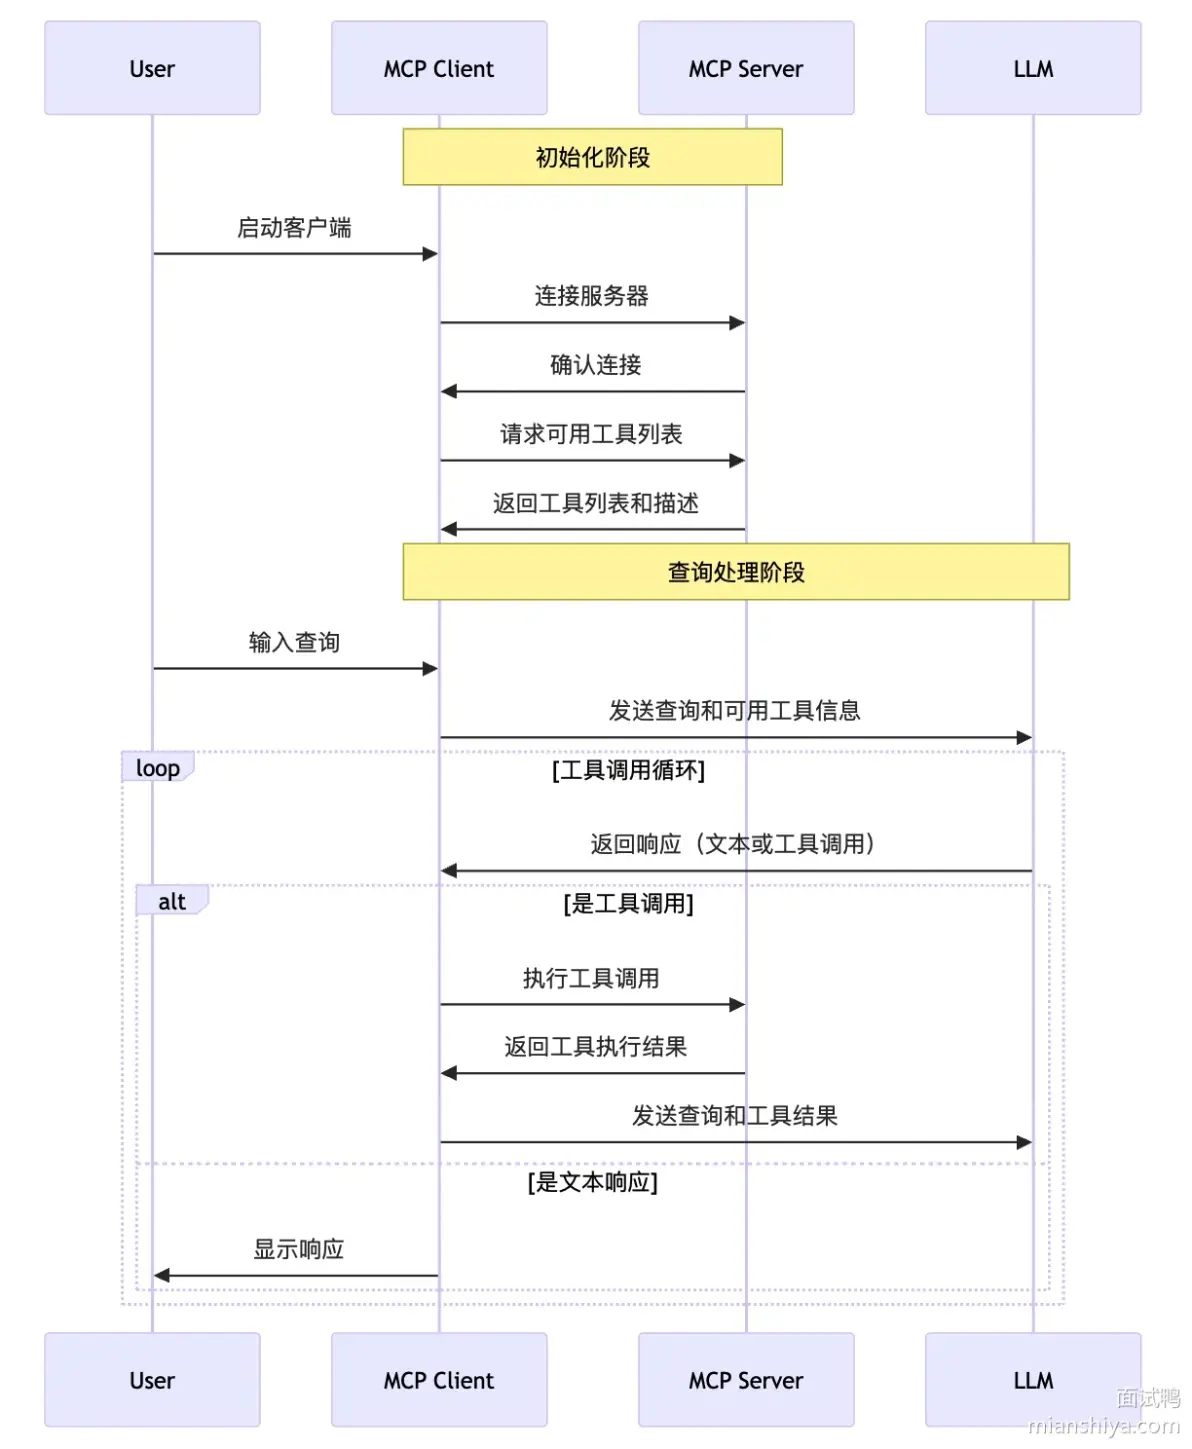
结果返回:MCP Server 执行完毕后,将结果原路返回给 MCP Client,Client 再将其返回给 LLM,最后由 LLM 生成最终的自然语言答案呈现给用户。
MCP 协议传输机制#
MCP 协议定义了 STDIO 和 Streamable HTTP 两种标准传输机制。stdio 通过标准输入输出流通信,Server 作为 Client 的子进程运行,适合本地工具;Streamable HTTP 可以是远程的 HTTP 服务。
MCP 引入 Streamable HTTP 替代原来的 HTTP + SSE 传输方式。
SSE 模式#
SSE (Server-Sent Events,服务端推送事件) 是一种基于 HTTP 的技术,允许服务器主动向客户端单向、持续地推送数据。
- 它的 MIME 类型是
text/event-stream。 - 工作原理:客户端发起一个普通的 HTTP 请求(通常是
GET),服务器不关闭连接,而是不断发送格式如data: something\n\n的消息块。
SSE 也有自己的一套文本格式。这个格式规定了数据如何被分段和发送。SSE 响应必须设置 Content-Type: text/event-stream,然后消息以纯文本形式发送,每条消息由几个字段组成,以空行(\n\n)分隔。
常见的 SSE 字段包括:
| 字段 | 说明 | 是否必需 |
|---|---|---|
data: | 消息的有效载荷内容 | 是 |
event: | 事件类型,用于客户端区分不同种类的消息 | 否 |
id: | 消息的唯一标识符,用于断线重连时恢复 | 否 |
retry: | 建议的重连等待时间(毫秒) | 否 |
1、建立连接:GET 开 SSE,服务器发 endpoint 事件
客户端先发一个普通 HTTP GET:
GET /sseAccept: text/event-stream服务器返回:
HTTP/1.1 200 OKContent-Type: text/event-stream然后这条连接不结束,保持为 SSE 长连接。服务器马上通过 SSE 发一个控制事件,通常叫 endpoint:
event: endpointdata: /messages?sessionId=abc123这个 data 里的 /messages?sessionId=abc123 就是客户端之后用来 POST 消息的地址。
注意:
- 这个地址是通过 SSE 事件发回来的,不是普通 GET 的 JSON 响应。
endpoint事件本身不是 JSON-RPC 消息,它只是 SSE 传输层的控制信息。- 这个 POST 地址通常带
sessionId,用来和刚才那条 SSE 连接绑定。
2、客户端上行:POST JSON-RPC
客户端拿到 POST 地址后,发送 JSON-RPC 请求:
POST /messages?sessionId=abc123Content-Type: application/json
{  "jsonrpc": "2.0",  "id": 1,  "method": "tools/call",  "params": { ... }}
服务器对这个 POST 的 HTTP 响应通常只是确认收到,比如:
HTTP/1.1 202 Accepted重点:这个 POST 的 HTTP 响应体通常不是 JSON-RPC 的业务结果。真正的 JSON-RPC 响应会通过之前建立的 SSE 长连接推回来。
3、服务器下行:通过 SSE 发 JSON-RPC
服务器处理完后,通过 SSE 连接发送:
event: messagedata: {"jsonrpc":"2.0","id":1,"result":{ ... }}这里的 data: 里面才是完整的 JSON-RPC 消息。
它可以是:
- JSON-RPC 响应,对应客户端之前的请求;
- JSON-RPC 请求,服务器主动要求客户端做事;
- JSON-RPC 通知,不需要回复。
所以服务器并不是只能“发回响应”,它也可以主动发请求或通知。
4、画成图大概是这样
客户端 服务器 | | | ---- GET /sse --------------------------> | | <--- 200 text/event-stream --------------- | | <--- event: endpoint --------------------- | | data: /messages?sessionId=abc123 | | | | ---- POST /messages?sessionId=abc123 ---> | | body: JSON-RPC 请求 | | <--- 202 Accepted ------------------------ | | | | <--- event: message ---------------------- | | data: JSON-RPC 响应 | | |SSE 模式可以理解为:
客户端 GET 开一条 SSE 长连接;服务器通过 SSE 告诉客户端“你往这个地址 POST”;客户端用 POST 发 JSON-RPC 上行;服务器用 SSE 发 JSON-RPC 下行。上行 POST + 下行 SSE 合起来,形成逻辑上的双向通信。
为什么要这样设计?
- SSE 本身是单向的,只能服务器推给客户端。所以必须靠 POST 补上客户端到服务器的方向。
- SSE 长连接用于在客户端和服务端之间“注册”一个会话,后续 POST 请求的返回值才能使用正确的 SSE 通道把响应或主动推送发回给对应的客户端。
Streamable HTTP 模式#
旧模式有几个痛点:
- 依赖两次往返(先 GET 返回 endpoint,再 POST 发请求 sse 返回),增加了延迟。
- 每个客户端需要维护一个长连接和一个短连接,状态复杂。
- 负载均衡器、代理很难处理 SSE 长连接(超时、重连、粘性会话等问题)。
新的 “Streamable HTTP” 只用一个 HTTP POST Endpoint 端点,通过响应格式的灵活选择,同时覆盖“普通请求-响应”和“服务端流式推送”:
- 客户端直接 POST 请求到固定 URL(如
/mcp)。 - 服务器根据需要,在同一个 HTTP 响应里直接返回 JSON 或 SSE 流。
也就是说:SSE 不再需要一个独立的 GET 端点,也不需要提前协商会话 ID,而是 作为 HTTP 响应体的一种编码格式,出现在 POST 请求的响应里。
所有消息(下面这四步)都由客户端通过 HTTP POST 请求,统一发送到服务器的同一个 MCP 端点(Endpoint):
-
连接初始化:initialize
-
连接建立完成通知:notifications/initialized
-
获取工具列表:tools/list
服务器返回的工具定义必须按确定顺序排列,以支持客户端的缓存策略
-
调用一个工具:tools/call
请求中需要指定工具名称和符合其Schema的参数
这其中 tools/list 非强制选项,如果已经提前缓存了 tools/list ,可以直接发起调用,但在动态环境中建议先使用 tools/list 以确保调用合法性。
需要注意的是:MCP Streamable HTTP 可以通过 Session ID 维护状态,但是这是可选项,本文后续默认使用无状态 Streamable HTTP。
JSON-RPC#
JSON-RPC:是一种基于 JSON 的“消息格式”,它定义了一套标准的请求和响应结构,让客户端可以像调用本地函数一样调用远程服务器上的方法。一个典型的 JSON-RPC 2.0 请求和响应如下:
Client Request#
请求体 Body 的基本格式如下:
{ "jsonrpc": "2.0", "id": 1, "method": "tools/call", "params":{ //... }}其中 jsonrpc 指定 RPC 版本;id 为本次会话中唯一的消息 id,可以是字符串也可以是数字;method 值为请求的操作,如 tools/list、tools/call 、ping 等;params 是可选的,如果是 method=tools/call,则 params 传入工具调用参数。
另外请求必须在 Accept 标头中同时列出 application/json 和 text/event-stream。
Accept: application/json, text/event-streamServer Response#
MCP Streamable HTTP 服务端处理通知请求时,如客户端发送连接建立完成通知,服务端则接受后返回 202 Accepted,无正文;若不接受则返回 HTTP 错误码(如 400)。
若客户端发送的是其他请求,如工具调用。服务器根据操作耗时决定响应模式,快速操作(Quick operations)通常直接返回 JSON 响应,而耗时操作(Long-running tasks)或需要服务器主动推送消息时,会切换为 SSE 流(text/event-stream)
tools/call 响应示例:
{ "id": 3, "jsonrpc": "2.0", "result": { //... }}为了兼容性,客户端需能够同时支持处理上述两种响应格式,也就是普通 JSON 响应和 SSE 流。
MCP Streamable HTTP 生命周期#
已知在 MCP Streamable HTTP 机制下,执行一个 Tools 调用的最小链路为:initialize -> notifications/initialized -> tools/list -> tools/call。下面会重点介绍一些这几个生命周期阶段的具体协议内容。
初始化 initialize#
在交互之前,客户端必须先发送 initialize 与服务器建立连接,在初始化阶段可以协商协议版本并交换各自支持的能力(Capabilities),比如确认服务器是否支持工具(Tools)功能。
比如下面的示例 POST Body,protocolVersion 字段表明了客户端支持的协议版本。
{ "method": "initialize", "params": { "protocolVersion": "2025-06-18", "capabilities": {}, "clientInfo": { "name": "Cherry Studio", "version": "1.5.9" } }, "jsonrpc": "2.0", "id": 0}服务端示例 Response:
{ "jsonrpc": "2.0", "id": 0, "result": { "protocolVersion": "2025-06-18", "capabilities": { "completions": {}, "prompts": { "listChanged": false }, "resources": { "subscribe": false, "listChanged": false }, "tools": { "listChanged": false } }, "serverInfo": { "name": "mcp-server", "version": "1.0.0" } }}这个示例中,服务端也说明了自身支持的协议版本为 2025-06-18,同时从 capabilities->tools 中可以确定服务端支持 tools。
通知 notifications/initialized#
在客户端发起 initialize 请求并收到服务端响应后,向服务端发送 notifications/initialized 用于通知服务器初始化已完成,可开始后续通信。
通知行为可以没有 id 字段。
{ "method": "notifications/initialized", "jsonrpc": "2.0"}服务端收到后响应无正文的 202 Accepted。
ping#
作用:用于检测连接是否依然可用,如客户端向服务端发起检测,反之亦然。
示例 POST Body :
{ "method": "ping", "jsonrpc": "2.0", "id": 1}服务端响应:
{ "jsonrpc": "2.0", "id": 1, "result": {}}tools/list#
用于工具发现。在初始化完成后,客户端通过调用此方法获取服务器提供的所有工具及其详细定义,包括工具名称、描述以及遵循 JSON Schema 的输入参数模式(inputSchema)。 用途:用于获取支持的工具信息,以便于后续的 LLM 选择调用。 注意:若客户端已缓存工具信息且服务器未声明 listChanged,可跳过。
示例 POST Body :
{ "method": "tools/list", "jsonrpc": "2.0", "id": 2}响应
{ "id": 2, "jsonrpc": "2.0", "result": { "tools": [ { "description": "获取城市天气", "inputSchema": { "type": "object", "properties": { "city": { "type": "string" } }, "required": [ "city" ], "additionalProperties": false }, "name": "getWeather" } ] }}tools/call#
这是工具调用的核心方法。客户端通过此方法发起工具调用,其中包含要调用的工具名称和具体参数(arguments),服务器执行对应操作后返回结果。
用途:客户端调用具体的服务端工具。
示例 POST Body :
{ "jsonrpc": "2.0", "id": 3, "method": "tools/call", "params": { "name": "getWeather", "arguments": { "city": "杭州" } }}服务端响应:
{ "id": 3, "jsonrpc": "2.0", "result": { "content": [ { "type": "text", "text": "杭州今日晴转多云" } ], "isError": false }}若工具内部出错,服务器应在响应中设置 isError: true,而非返回 JSON-RPC 错误,以便 LLM 能感知并自我修正。
demo 手动实现#
Java 版#
一个基于 Spring Boot + Fastjson2 的 简易 MCP(Model Context Protocol)服务,提供 城市天气查询功能的实现如下。
-
引入 Spring Boot WebMVC 和 FastJSON。
<dependency><groupId>org.springframework.boot</groupId><artifactId>spring-boot-starter-webmvc</artifactId></dependency><dependency><groupId>com.alibaba.fastjson2</groupId><artifactId>fastjson2</artifactId><version>2.0.53</version></dependency> -
定义接口
/mcp,实现 MCP 生命周期的基本 RPC 消息的解析处理。@RestController@RequestMapping("/mcp")public class McpWeatherController {private static final Logger log = LoggerFactory.getLogger(McpWeatherController.class);// 1. 静态化工具定义,使 tools/list 极其简洁private static final List<Tool> AVAILABLE_TOOLS = List.of(new Tool("getWeather", "获取指定城市的天气预报",JSONObject.parseObject("""{"type": "object","properties": { "city": { "type": "string", "description": "城市名" } },"required": ["city"],"additionalProperties": false}""")));@PostMapping(consumes = "application/json", produces = "application/json")public ResponseEntity<?> handleMcpRequest(@RequestBody JsonRpcRequest request) {Object id = request.id();var response = switch (request.method()) {case "initialize" -> ok(id, new InitializeResult());case "notifications/initialized" -> accepted();case "ping" -> ok(id, Map.of());case "tools/list" -> ok(id, Map.of("tools", AVAILABLE_TOOLS));case "tools/call" -> handleToolCall(id, request.params());default -> ResponseEntity.notFound().build();};log.info("\nrequest: {}\nresponse:{}", JSON.toJSONString(request, Feature.PrettyFormat), JSON.toJSONString(response.getBody(),Feature.PrettyFormat));return response;}/*** 优雅处理工具调用:直接通过 JSONObject 转换,无需 String 二次中转*/private ResponseEntity<?> handleToolCall(Object id, JSONObject params) {if (params == null) return badRequest();var callParams = params.toJavaObject(ToolCallParams.class);// 使用 switch 处理多工具扩展性更好return switch (callParams.name()) {case "getWeather" -> {String city = String.valueOf(callParams.arguments().getOrDefault("city", "未知城市"));yield ok(id, new ToolCallResult(city + "今日雷暴雨,建议居家"));}default -> badRequest();};}// --- 辅助方法 ---private static ResponseEntity<JsonRpcResponse> ok(Object id, Object result) {return ResponseEntity.ok(new JsonRpcResponse(id, result));}private static ResponseEntity<Void> accepted() {return ResponseEntity.status(202).build();}private static ResponseEntity<Void> badRequest() {return ResponseEntity.badRequest().build();}// --- MCP 协议 Records (Java 21) ---// 将 params 定义为 JSONObject,方便后续 toJavaObject 转换public record JsonRpcRequest(String jsonrpc, Object id, String method, JSONObject params) {}public record JsonRpcResponse(String jsonrpc, Object id, Object result) {public JsonRpcResponse(Object id, Object result) {this("2.0", id, result);}}// 初始化结果模型public record InitializeResult(String protocolVersion, Capabilities capabilities, ServerInfo serverInfo) {public InitializeResult() {this("2025-06-18", new Capabilities(new Tools(false)), new ServerInfo("mcp-weather-server", "1.0.0"));}}public record ServerInfo(String name, String version) {}public record Capabilities(Tools tools) {}public record Tools(boolean listChanged) {}// 工具定义模型public record Tool(String name, String description, Object inputSchema) {}// 工具调用参数模型public record ToolCallParams(String name, Map<String, Object> arguments) {}// 响应内容模型public record Content(String type, String text) {public Content(String text) { this("text", text); }}public record ToolCallResult(List<Content> content, boolean isError) {public ToolCallResult(String text) {this(List.of(new Content(text)), false);}}}
这就是完整代码了,启动后是一个最小化实现的 MCP Streamable HTTP 服务,它遵循 MCP Streamable HTTP 协议规范,利用 Java 21 的现代语言特性(如 record、switch 表达式、文本块等)来提升代码的简洁性与可读性。
使用测试#
我使用 LLM 客户端 Cherry Studio 添加这个 MCP 服务,然后询问北京天气,从日志中可以看到服务端在初始化 -> 通知 ->tools/list 之后,进行了 tools/call 调用,并响应了 “北京今日雷暴雨,建议居家”。
request: {"id":0,"jsonrpc":"2.0","method":"initialize","params":{"protocolVersion":"2025-06-18","capabilities":{},"clientInfo":{"name":"Cherry Studio","version":"1.5.9"}}}response: {"id":0,"jsonrpc":"2.0","result":{"capabilities":{"tools":{"listChanged":false}},"protocolVersion":"2025-06-18","serverInfo":{"name":"mcp-weather-server","version":"1.0.0"}}}-------------------request: {"jsonrpc":"2.0","method":"notifications/initialized"}response: null-------------------request: {"id":1,"jsonrpc":"2.0","method":"tools/list"}response: {"id":1,"jsonrpc":"2.0","result":{"tools":[{"description":"获取指定城市的天气预报","inputSchema":{"type":"object","properties":{"city":{"type":"string","description":"城市名"}},"required":["city"],"additionalProperties":false},"name":"getWeather"}]}}-------------------request: {"id":2,"jsonrpc":"2.0","method":"ping"}response: {"id":2,"jsonrpc":"2.0","result":{}}-------------------request: {"id":3,"jsonrpc":"2.0","method":"prompts/list"}response: null-------------------request: {"id":4,"jsonrpc":"2.0","method":"ping"}response: {"id":4,"jsonrpc":"2.0","result":{}}-------------------request: {"id":5,"jsonrpc":"2.0","method":"resources/list"}response: null-------------------request: {"id":6,"jsonrpc":"2.0","method":"ping"}response: {"id":6,"jsonrpc":"2.0","result":{}}-------------------request: {"id":7,"jsonrpc":"2.0","method":"tools/call","params":{"name":"getWeather","arguments":{"city":"北京"},"_meta":{"progressToken":9}}}response: {"id":7,"jsonrpc":"2.0","result":{"content":[{"text":"北京今日雷暴雨,建议居家","type":"text"}],"isError":false}}Python 版#
mcp-server#
# pip install mcpfrom mcp.server import Serverfrom mcp.server.stdio import stdio_serverfrom mcp.types import (    Tool, TextContent, CallToolResult,    ListToolsResult)
# 创建 MCP Serverserver = Server("my-tools-server")
# 声明可用工具@server.list_tools()async def list_tools() -> ListToolsResult:    return ListToolsResult(tools=[        Tool(            name="calculate",            description="计算数学表达式",            inputSchema={                "type": "object",                "properties": {                    "expression": {                        "type": "string",                        "description": "要计算的数学表达式"                    }                },                "required": ["expression"]            }        ),        Tool(            name="read_file",            description="读取文件内容",            inputSchema={                "type": "object",                "properties": {                    "path": {                        "type": "string",                        "description": "文件路径"                    }                },                "required": ["path"]            }        )    ])
# 实现工具逻辑@server.call_tool()async def call_tool(name: str, arguments: dict) -> CallToolResult:    if name == "calculate":        import math        try:            expression = arguments["expression"]            safe_env = {k: getattr(math, k) for k in dir(math) if not k.startswith('_')}            # ⚠️ 安全警告:eval() 在生产环境中有安全风险            # 建议使用 simpleeval 库替代:pip install simpleeval            result = eval(expression, {"__builtins__": {}}, safe_env)            return CallToolResult(                content=[TextContent(type="text", text=f"{expression} = {result}")]            )        except Exception as e:            return CallToolResult(                content=[TextContent(type="text", text=f"错误:{e}")],                isError=True            )
    elif name == "read_file":        path = arguments["path"]        try:            with open(path, 'r', encoding='utf-8') as f:                content = f.read()            return CallToolResult(                content=[TextContent(type="text", text=content)]            )        except Exception as e:            return CallToolResult(                content=[TextContent(type="text", text=f"读取失败:{e}")],                isError=True            )
    else:        return CallToolResult(            content=[TextContent(type="text", text=f"未知工具:{name}")],            isError=True        )
# 以 stdio 模式运行(供 Claude Desktop 等客户端连接)async def main():    async with stdio_server() as (read_stream, write_stream):        await server.run(read_stream, write_stream)
if __name__ == "__main__":    import asyncio    asyncio.run(main())
# MCP 除了工具(Tools),还支持:
# 1. 资源(Resources):静态数据源@server.list_resources()async def list_resources(): return [ Resource( uri="file:///docs/readme.md", name="项目文档", mimeType="text/markdown" ) ]
# 2. 提示词模板(Prompts)@server.list_prompts()async def list_prompts(): return [ Prompt( name="code_review", description="代码审查模板", arguments=[ PromptArgument(name="code", required=True) ] ) ]在 Agent 中使用 MCP#
# pip install mcp anthropicimport anthropicfrom mcp import ClientSession, StdioServerParametersfrom mcp.client.stdio import stdio_clientimport asyncio
async def use_mcp_tools(query: str):    """使用 MCP 工具的 Agent"""
    # 连接到 MCP Server    server_params = StdioServerParameters(        command="python",        args=["my_mcp_server.py"],  # 上面定义的服务器文件    )
    async with stdio_client(server_params) as (read, write):        async with ClientSession(read, write) as session:            await session.initialize() # 初始化连接            tools_result = await session.list_tools() # 获取可用工具
            # 将 MCP 工具转换为 Anthropic 格式            anthropic_tools = [                {                    "name": tool.name,                    "description": tool.description,                    "input_schema": tool.inputSchema                }                for tool in tools_result.tools            ]
            client = anthropic.Anthropic()
            # 调用 Claude 并允许使用工具            response = client.messages.create(                model="claude-4-sonnet-20250514",                max_tokens=1024,                tools=anthropic_tools,                messages=[{"role": "user", "content": query}]            )
            # 处理工具调用            while response.stop_reason == "tool_use":                tool_results = []                for content_block in response.content:                    if content_block.type == "tool_use":                        # 通过 MCP 执行工具                        tool_result = await session.call_tool(                            content_block.name,                            content_block.input                        )
                        tool_results.append({                            "type": "tool_result",                            "tool_use_id": content_block.id,                            "content": tool_result.content[0].text                        })
                # 继续对话                response = client.messages.create(                    model="claude-4-sonnet-20250514",                    max_tokens=1024,                    tools=anthropic_tools,                    messages=[                        {"role": "user", "content": query},                        {"role": "assistant", "content": response.content},                        {"role": "user", "content": tool_results}                    ]                )
            # 返回最终文本回复            for block in response.content:                if hasattr(block, "text"):                    return block.text
# 测试asyncio.run(use_mcp_tools("计算 sqrt(144) + pi * 2"))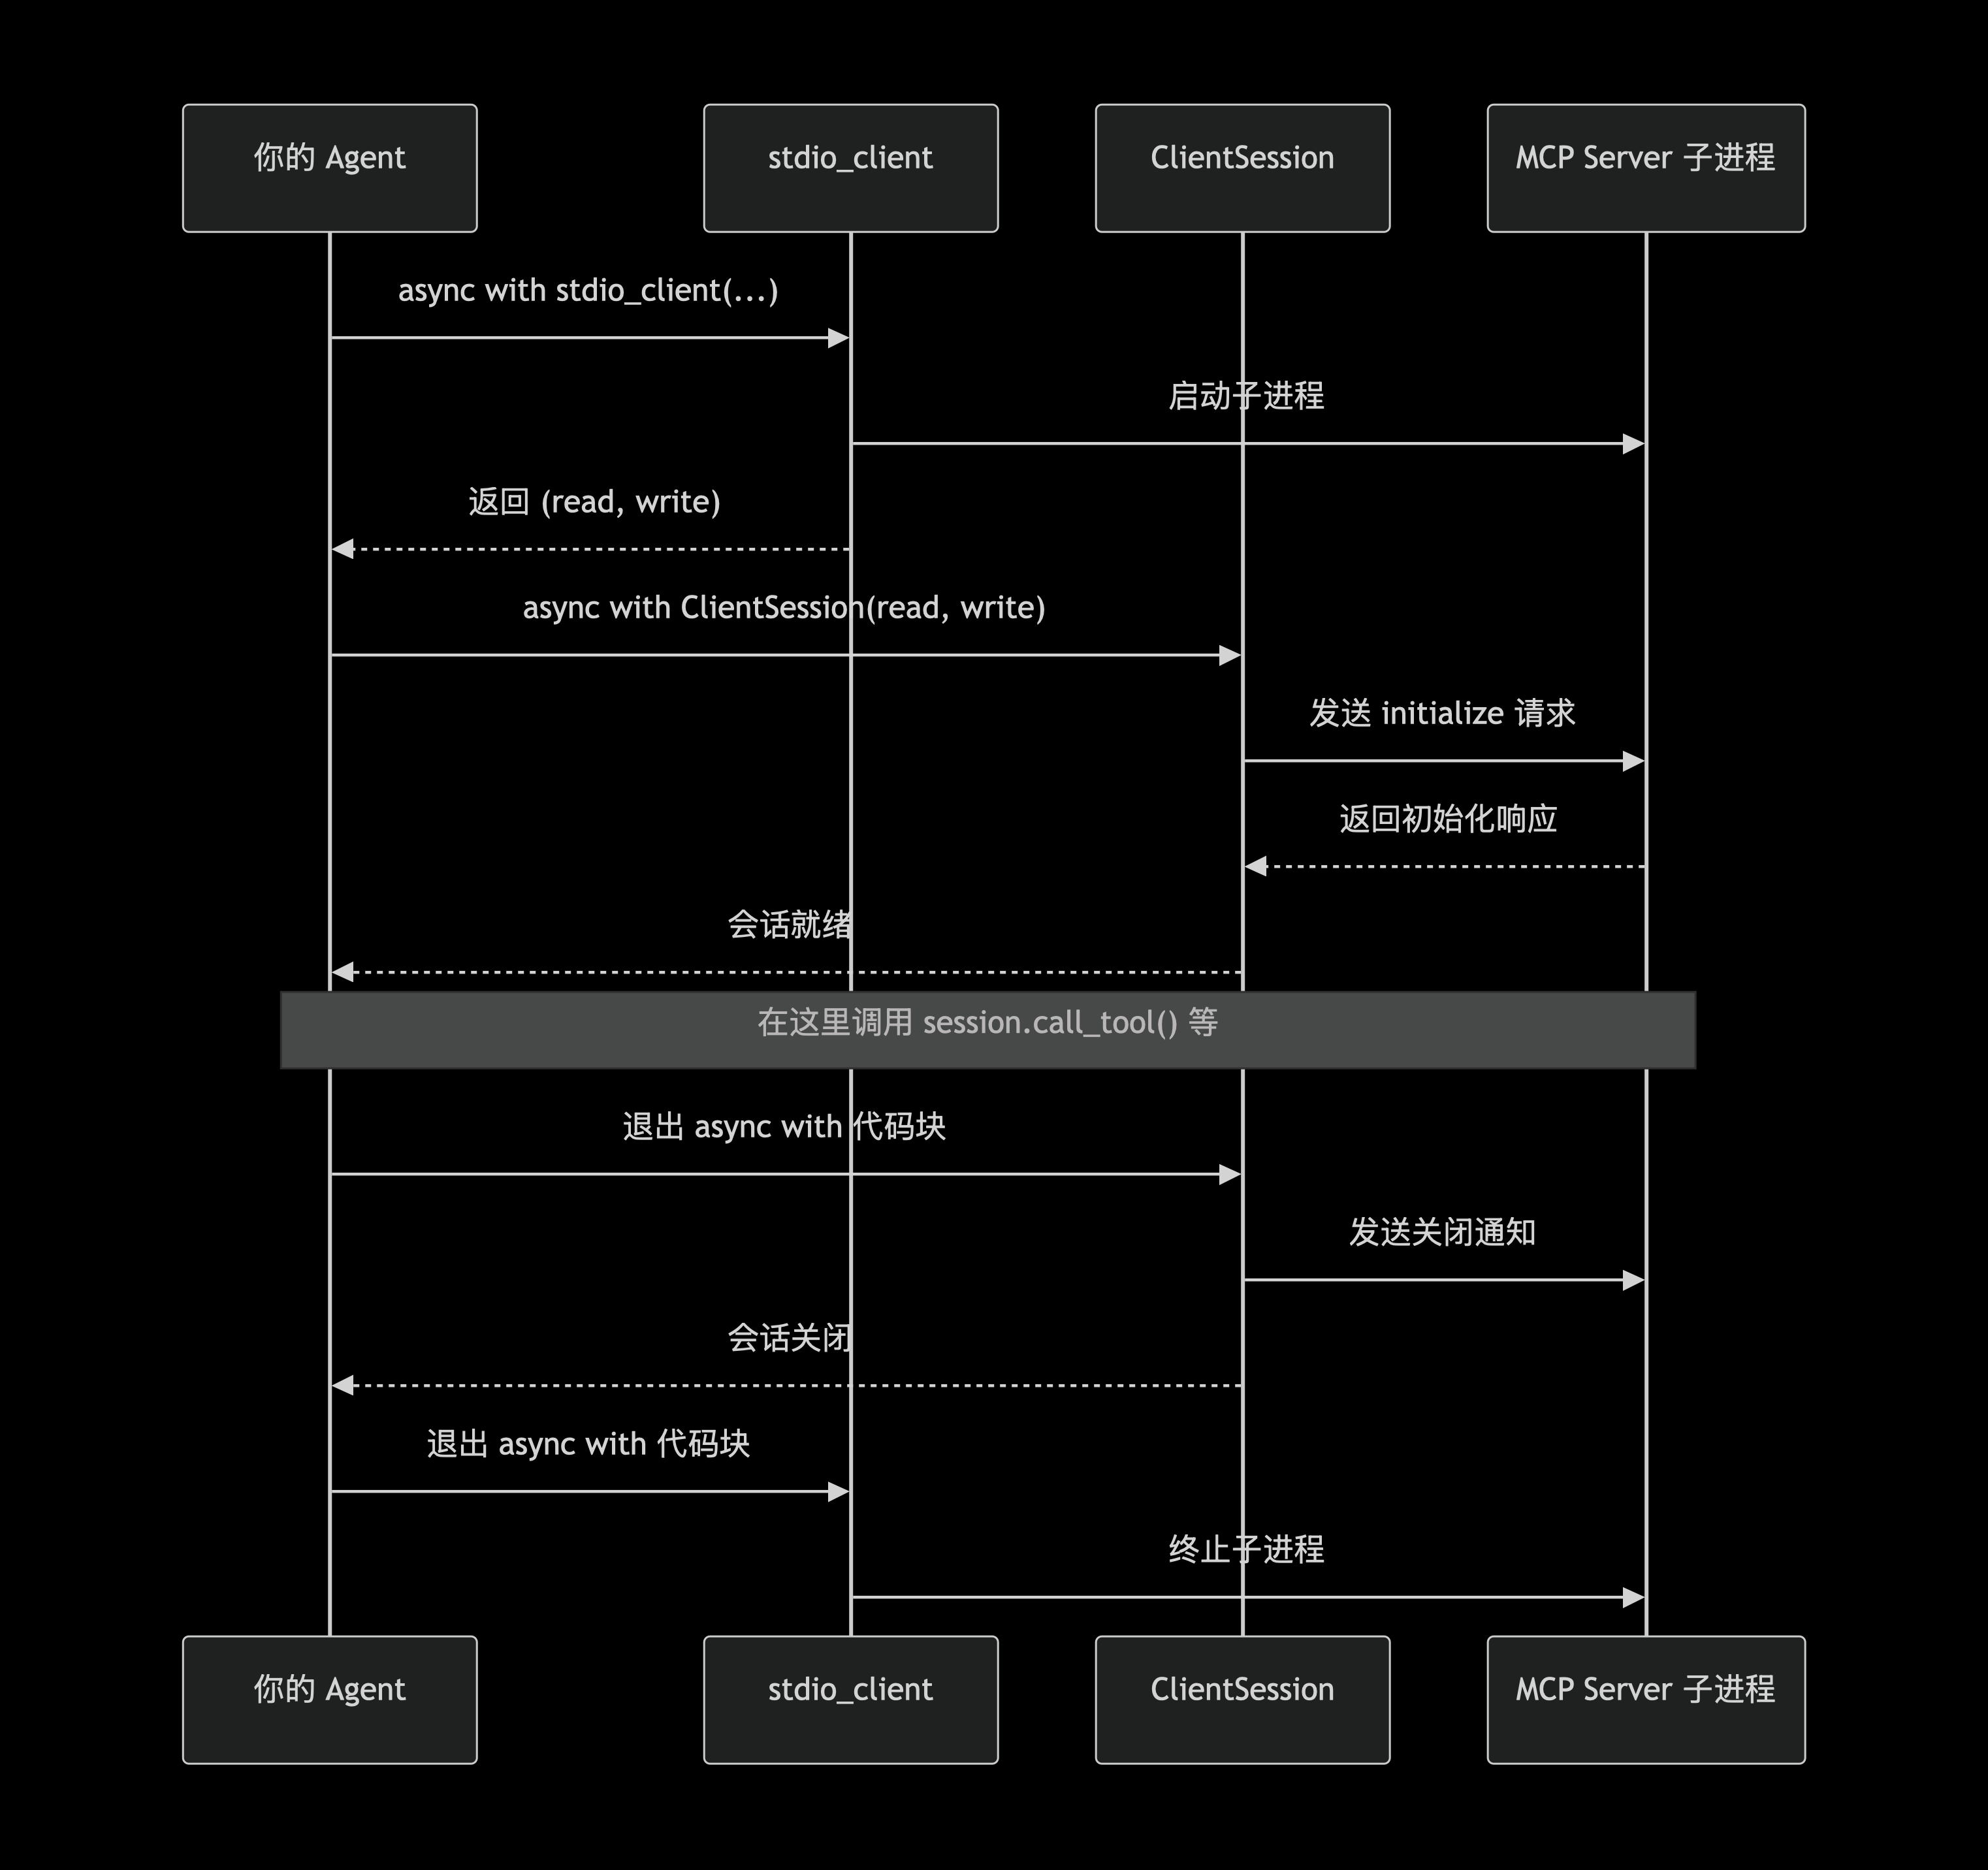
1、传输层
async with stdio_client(server_params) as (read, write):stdio_client启动 MCP Server 作为一个子进程- 它返回一对流:
read(读流)和write(写流) async with负责:- 进入时:启动子进程,建立通信管道
- 退出时:关闭子进程,清理资源
2、会话层
async with ClientSession(read, write) as session:ClientSession基于上面得到的read/write流,创建一个 MCP 会话- 会话封装了 MCP 协议的细节(初始化握手、消息收发、请求/响应匹配等)
async with负责:- 进入时:执行 MCP 协议初始化(发送
initialize请求) - 退出时:发送关闭通知,清理会话资源
- 进入时:执行 MCP 协议初始化(发送
TS 版#
mcp-server#

项目的基本结构#
my-mcp-server/├── src/ # 源码│ └── index.ts # 主入口├── build/ # 编译输出(gitignored)│ └── index.js├── node_modules/├── package.json # 依赖和脚本├── tsconfig.json # 编译器配置├── dependencies.sh # 全局依赖安装脚本(可选)├── Dockerfile├── dockerBuild.sh├── dockerPublish.sh├── publish.sh├── start.sh # 本地开发启动脚本└── README.mdpackage.json 是 Node.js 项目的配置中心:记录项目身份(名字、版本)、依赖(需要哪些包)、脚本(怎么运行、怎么构建),以及入口点、可执行命令等。
{ "name": "@yourname/my-mcp-server", "version": "1.0.0", "description": "MCP server for ...", "main": "build/index.js", "bin": { "my-mcp-server": "build/index.js" }, "scripts": { "build": "tsc", "start": "node build/index.js", "dev": "tsx watch src/index.ts" }, "dependencies": { "@modelcontextprotocol/sdk": "^1.0.0" }, "devDependencies": { "@types/node": "^20.0.0", "tsx": "^4.0.0", "typescript": "^5.0.0" }, "keywords": ["mcp", "model-context-protocol"], "author": "yourname", "license": "MIT"}package-lock.json 锁定了每一次安装时所有依赖的精确版本,保证在不同机器、不同时间安装的结果完全一致。
{ "compilerOptions": { "target": "ES2022", "module": "NodeNext", "moduleResolution": "NodeNext", "outDir": "./build", "rootDir": "./src", "strict": true, "esModuleInterop": true, "skipLibCheck": true, "declaration": true }, "include": ["src/**/*"], "exclude": ["node_modules", "build"]}compilerOptions:编译器的行为include:告诉 tsc 编译哪些文件exclude:告诉 tsc 忽略哪些文件
index.ts#
#!/usr/bin/env node// 第一行是 Shebang(解释器指令):用 env 找到 node 的位置,然后用 node 解释器执行脚本
import { Server } from "@modelcontextprotocol/sdk/server/index.js";import { StdioServerTransport } from "@modelcontextprotocol/sdk/server/stdio.js";import {  CallToolRequestSchema,  ListToolsRequestSchema,  ListResourcesRequestSchema,  ReadResourceRequestSchema,  ListPromptsRequestSchema,  GetPromptRequestSchema,} from "@modelcontextprotocol/sdk/types.js";
// ============= 工具定义 =============const TOOLS = [  {    name: "hello",    description: "返回问候语",    inputSchema: {      type: "object",      properties: {        name: { type: "string", description: "要问候的名字" },      },      required: ["name"],    },  },  {    name: "echo",    description: "返回输入的消息",    inputSchema: {      type: "object",      properties: {        message: { type: "string", description: "要回显的消息" },      },      required: ["message"],    },  },];
// ============= 资源定义 =============const RESOURCES = [  {    uri: "info://status",    name: "服务状态",    description: "返回 MCP Server 的运行状态",    mimeType: "application/json",  },];
// ============= Prompt 定义 =============const PROMPTS = [  {    name: "greet",    description: "生成一个友好的问候提示",    arguments: [      {        name: "user",        description: "用户名",        required: true,      },    ],  },];
// ============= 工具处理函数 =============async function handleToolCall(name: string, args: any) {  switch (name) {    case "hello":      return {        content: [{ type: "text", text: `Hello, ${args.name}!` }],      };    case "echo":      return {        content: [{ type: "text", text: args.message }],      };    default:      throw new Error(`Unknown tool: ${name}`);  }}
// ============= 资源处理函数 =============async function handleResourceRead(uri: string) {  if (uri === "info://status") {    return {      contents: [        {          uri,          mimeType: "application/json",          text: JSON.stringify({ status: "running", timestamp: Date.now() }),        },      ],    };  }  throw new Error(`Unknown resource: ${uri}`);}
// ============= Prompt 处理函数 =============async function handlePromptGet(name: string, args: any) {  if (name === "greet") {    const userName = args?.user || "there";    return {      messages: [        {          role: "user",          content: {            type: "text",            text: `Please generate a warm greeting for ${userName}.`,          },        },      ],    };  }  throw new Error(`Unknown prompt: ${name}`);}
// ============= 主函数 =============async function main() {  const server = new Server(    {      name: "my-mcp-server",      version: "1.0.0",    },    {      capabilities: {        tools: {},        resources: {},        prompts: {},      },    }  );
  // 注册工具列表处理器  server.setRequestHandler(ListToolsRequestSchema, async () => ({    tools: TOOLS,  }));
  // 注册工具调用处理器  server.setRequestHandler(CallToolRequestSchema, async (request) => {    const { name, arguments: args } = request.params;    return handleToolCall(name, args);  });
  // 注册资源列表处理器  server.setRequestHandler(ListResourcesRequestSchema, async () => ({    resources: RESOURCES,  }));
  // 注册资源读取处理器  server.setRequestHandler(ReadResourceRequestSchema, async (request) => {    const { uri } = request.params;    return handleResourceRead(uri);  });
  // 注册 Prompt 列表处理器  server.setRequestHandler(ListPromptsRequestSchema, async () => ({    prompts: PROMPTS,  }));
  // 注册 Prompt 获取处理器  server.setRequestHandler(GetPromptRequestSchema, async (request) => {    const { name, arguments: args } = request.params;    return handlePromptGet(name, args);  });
  // 启动 stdio 传输  const transport = new StdioServerTransport();  await server.connect(transport);  console.error("MCP Server running on stdio");}
main().catch((error) => { console.error("Server error:", error); process.exit(1);});发布#
1、发布到 npm
./publish.shpublish.sh
#!/bin/bashset -e
# 运行测试(如果有)# npm test
# 构建npm run build
# 发布到 npmnpm publish --access public
echo "Published to npm"
2、发布 Docker 镜像
./dockerBuild.sh # 构建镜像./dockerPublish.sh # 推送到 Docker HubdockerBuild.sh
#!/bin/bashVERSION=${1:-1.0.0}IMAGE_NAME="yourname/my-mcp-server"
echo "Building ${IMAGE_NAME}:${VERSION}..."docker build -t ${IMAGE_NAME}:${VERSION} .docker tag ${IMAGE_NAME}:${VERSION} ${IMAGE_NAME}:latestecho "Done"
dockerPublish.sh
#!/bin/bashVERSION=${1:-1.0.0}IMAGE_NAME="yourname/my-mcp-server"
echo "Pushing ${IMAGE_NAME}:${VERSION}..."docker push ${IMAGE_NAME}:${VERSION}docker push ${IMAGE_NAME}:latestecho "Done"
Dockerfile 是用来把 PI API MCP Server 打包成一个 Docker 镜像的。这样别人不需要安装 Node.js、配置依赖、手动编译——只要装了 Docker,一条命令就能跑起来。

3、发布前需要确认 dockerBuild.sh 中的版本号与 package.json 一致。
package.json 中的版本号需要手动更新,遵循语义化版本(semver):
| 版本变化 | 场景 |
|---|---|
| 1.0.0 → 1.1.0 | 新增功能,向后兼容 |
| 1.0.0 → 2.0.0 | 不兼容的 API 变更 |
| 1.0.0 → 1.0.1 | bug 修复 |
本地配置#
CLI 的配置文件主要存在于以下位置:
| 配置作用域 | 文件路径 | 说明 |
|---|---|---|
| 全局配置 | ~/.claude.json | 应用于你所有的 Claude Code 会话 |
| 项目级配置 | 项目根目录下的 .mcp.json | 可以提交到 Git,让团队成员共享 MCP 配置 |
1、Docker 配置(推荐)
{ "mcpServers": { "my-mcp-server": { "command": "docker", "args": [ "run", "-i", "--rm", "yourname/my-mcp-server:latest" ], "autoApprove": ["hello", "echo"] } }}- autoApprove 的作用:列出不需要用户确认就可以自动执行的工具。如果不列,Claude 每次调用工具都会弹窗问你是否允许。
2、Node.js(npx)配置
{ "mcpServers": { "my-mcp-server": { "command": "npx", "args": [ "-y", "@yourname/my-mcp-server" ], "autoApprove": ["hello", "echo"] } }}开发流程#
# 1. 克隆代码git clone git@github.com:mingzilla/pi-api-mcp-server.gitcd pi-api-mcp-server
# 2. 安装依赖npm install          # 根据 package.json 安装项目依赖(安装在当前目录的 node_modules/ 里)./dependencies.sh    # 安装全局依赖(比如 npm install -g 某个工具,或者安装系统级依赖)
# 3. 构建npm run build
# 4. 本地测试(用 Node.js 运行)npm start
dependencies.sh
#!/bin/bash# 用 /bin/bash 这个程序来执行当前脚本
# 如果使用 nvm# nvm use 20
# 全局安装 TypeScript 相关工具(可选)npm install -g typescriptnpm install -g @types/node
# 如果有其他全局依赖# npm install -g some-global-tool
本地测试时的 MCP 配置
{ "mcpServers": { "my-mcp-server-dev": { "command": "node", "args": ["/absolute/path/to/my-mcp-server/build/index.js", "--api-url", "http://localhost:8224/pi/api/v2"], "autoApprove": ["hello", "echo"] } }}在 Agent 中使用 MCP 工具#
#!/usr/bin/env node
import { Anthropic } from "@anthropic-ai/sdk";import { Client } from "@modelcontextprotocol/sdk/client/index.js";import { StdioClientTransport } from "@modelcontextprotocol/sdk/client/stdio.js";import { CallToolResultSchema, ListToolsResultSchema } from "@modelcontextprotocol/sdk/types.js";
interface McpTool {  name: string;  description?: string;  inputSchema: {    type: "object";    properties?: Record<string, unknown>;    required?: string[];  };}
interface ToolCallContent {  type: "tool_use";  id: string;  name: string;  input: Record<string, unknown>;}
interface AssistantContent {  type: "text";  text: string;}
interface ToolResultContent {  type: "tool_result";  tool_use_id: string;  content: string;}
async function useMcpTools(query: string): Promise<string> {  // 1. 连接到 MCP Server  const transport = new StdioClientTransport({    command: "node",  // 或 "python",取决于你的 MCP Server    args: ["./path/to/your-mcp-server.js"],  // 你的 MCP Server 路径  });
  const client = new Client(    { name: "my-agent", version: "1.0.0" },    { capabilities: {} }  );
  await client.connect(transport);
  try {    // 2. 获取可用工具    const toolsResult = await client.request(      { method: "tools/list" },      ListToolsResultSchema    );
    // 3. 转换 MCP 工具为 Anthropic 格式    const anthropicTools: Anthropic.Tool[] = toolsResult.tools.map((tool: McpTool) => ({      name: tool.name,      description: tool.description || "",      input_schema: tool.inputSchema,    }));
    const anthropic = new Anthropic();
    // 4. 初始消息    let messages: Anthropic.MessageParam[] = [      { role: "user", content: query }    ];
    let response = await anthropic.messages.create({      model: "claude-3-sonnet-20241022",  // 或 "claude-4-sonnet-20250514"      max_tokens: 1024,      tools: anthropicTools,      messages: messages,    });
    // 5. 处理工具调用循环    while (response.stop_reason === "tool_use") {      // 保存 assistant 的响应      messages.push({        role: "assistant",        content: response.content,      });
      const toolResults: ToolResultContent[] = [];
      // 处理每个 tool_use 块      for (const block of response.content) {        if (block.type === "tool_use") {          // 通过 MCP 执行工具          const toolResult = await client.request(            {              method: "tools/call",              params: {                name: block.name,                arguments: block.input,              },            },            CallToolResultSchema          );
          // 提取结果文本          let resultText = "";          for (const content of toolResult.content) {            if (content.type === "text") {              resultText += content.text;            }          }
          toolResults.push({            type: "tool_result",            tool_use_id: block.id,            content: resultText,          });        }      }
      // 添加 tool_result 消息      messages.push({        role: "user",        content: toolResults as any, // ToolResultBlock 类型      });
      // 继续对话      response = await anthropic.messages.create({        model: "claude-3-sonnet-20241022",        max_tokens: 1024,        tools: anthropicTools,        messages: messages,      });    }
    // 6. 返回最终文本回复    for (const block of response.content) {      if (block.type === "text") {        return block.text;      }    }
    return "No text response from Claude";  } finally {    await client.close();  }}
// 测试async function main() {  const result = await useMcpTools("计算 sqrt(144) + pi * 2");  console.log(result);}
if (require.main === module) {  main().catch(console.error);}
export { useMcpTools };
应用级 Agent 中的 MCP 模块开发#
┌─────────────────────────────────────────────────────────────────────────────────┐│ Trae / IDE 进程 ││ ││ ┌───────────────────┐ ┌──────────────────────────────────────────────┐ ││ │ 读取 mcp.json │ │ MCP 客户端模块 │ ││ │ │ │ │ ││ │ ┌─────────────┐ │ │ 1. 解析配置,区分类型: │ ││ │ │ 本地服务器 │ │────▶│ - 有 "command" → 启动子进程 (stdio) │ ││ │ │(command+args)│ │ │ - 有 "url" → 准备 HTTP 连接 │ ││ │ └─────────────┘ │ │ │ ││ │ ┌─────────────┐ │ │ 2. 向【所有服务器】请求工具列表 │ ││ │ │ 远程服务器 │ │ │ - 本地: 写 stdin → 读 stdout │ ││ │ │ (url) │ │ │ - 远程: POST /tools/list │ ││ │ └─────────────┘ │ │ │ ││ └───────────────────┘ │ 3. 合并工具列表,转换格式 (MCP→OpenAI格式) │ ││ │ │ 4. 将转换后的工具列表注入 Agent 上下文 │ ││ │ └──────────────┬───────────────────────────────┘ ││ │ │ ││ │ ▼ ││ │ ┌──────────────────────────────────────────────┐ ││ │ │ Agent 核心模块 │ ││ │ │ │ ││ │ │ ① 构造API请求 (messages + tools) │ ││ │ │ ② 调用外部 LLM API (Claude/GPT) │ ││ │ │ ③ 解析响应: │ ││ │ │ - 若为普通文本 → 返回给用户 │ ││ │ │ - 若为 tool_calls → 提取调用指令 │ ││ │ │ ④ 将调用指令 (tool名+参数) 发给MCP客户端 │ ││ │ └──────────────┬───────────────────────────────┘ ││ │ │ │└──────────────┼────────────────────────────┼───────────────────────────────────┘ │ │ │ ┌──────────────────────┘ (按工具名路由) │ │ │ ▼ │ ┌─────────────────────────────────────┐ │ │ MCP 客户端执行工具调用 (统一接口) │ │ │ 根据工具名查表,决定走哪种通道: │ │ │ - 本地工具 → 写对应子进程的 stdin │ │ │ - 远程工具 → POST 远程服务器的 URL │ │ └────────┬───────────────┬────────────┘ │ │ │ ▼ ▼ ▼┌──────────────────────────────────────────────────────────────────────┐│ 底层传输通道 ││ ││ ┌─────────────────────────┐ ┌─────────────────────────────────────┐││ │ 本地通信 (stdio) │ │ 远程通信 (HTTP/SSE) │││ │ │ │ │││ │ ┌───────────┐ ┌──────┐ │ │ ┌─────────────────────────────┐ │││ │ │ 子进程A │ │子进程B│ │ │ │ 外部服务器 C (远程) │ │││ │ │ filesystem│ │apifox│ │ │ │ URL: https://xxx.com/mcp │ │││ │ │ (stdio) │ │ │ │ │ │ (Streamable HTTP / SSE) │ │││ │ └───────────┘ └──────┘ │ │ └─────────────────────────────┘ │││ └─────────────────────────┘ └─────────────────────────────────────┘│└──────────────────────────────────────────────────────────────────────┘mcp.json#
{  // ============================================================  //  MCP 服务器配置  //  支持两种传输方式:  //    1. stdio            —— 本地子进程(通过 command + args 启动)  //    2. streamable-http  —— 远程 HTTP 服务(官方推荐,单端点)  // ============================================================
  "mcpServers": {
    // ---------- 示例 1:本地 stdio 服务器 ----------    // 使用 npx 启动文件系统操作服务器    "filesystem": {      "command": "npx",      "args": [        "-y",        "@modelcontextprotocol/server-filesystem",        "/path/to/your/workspace"   // 替换为允许访问的目录      ],      // 可选:环境变量      "env": {        "NODE_ENV": "production"      },      // 可选:工作目录      "cwd": "/path/to/working/dir"    },
    // ---------- 示例 2:本地 Python 服务器 ----------    "my-python-server": {      "command": "python",      "args": [        "-m",        "my_mcp_server"      ]    },
    // ---------- 示例 3:远程 Streamable HTTP 服务器 ----------    // 使用官方推荐的 Streamable HTTP 协议连接远程服务    // 服务器只需提供一个统一的 MCP 端点 URL    "remote-github": {      "url": "https://api.github.com/mcp",      "transport": "streamable-http",      // 可选:自定义请求头(如 API 密钥)      "headers": {        "Authorization": "Bearer ${GITHUB_TOKEN}"      },      // 可选:超时时间(毫秒),默认 30000      "timeout": 30000    },
    // ---------- 示例 4:另一个远程服务 ----------    "cloud-db": {      "url": "https://db.example.com/mcp",      "transport": "streamable-http",      "headers": {        "X-API-Key": "${DB_API_KEY}"      }    }
    // 你可以继续添加更多服务器...  },
  // ============================================================  //  全局选项(可选)  // ============================================================
  // 是否在启动时自动连接所有服务器(默认 true)  "autoConnect": true,
  // 工具名称前缀策略(默认 "mcp__<server>__<tool>")  "toolNamePrefix": "mcp",
  // 是否启用工具缓存(缓存 tools/list 结果,减少启动延迟)  "cacheTools": true,
  // 缓存文件路径(默认 .pi/mcp-cache.json)  "cachePath": ".pi/mcp-cache.json"}
MCP 初体验#
下载并安装 Claude for Desktop
然后,打开 Settings -> Developer 配置页面:
点击 Edit Config 按钮,进入 Claude 配置文件所在目录,打开 claude_desktop_config.json 配置文件,输入如下内容:
{ "mcpServers": { "filesystem": { "command": "npx", "args": [ "-y", "@modelcontextprotocol/server-filesystem", "/Users/aneasystone/Downloads/demo" ] } }}这是官方开发的 Filesystem MCP Server,用于操作你的本地文件,比如读取、编辑、搜索等。最后一个参数是文件路径,表示只允许 Claude 访问这个目录,可以添加一个或多个。
注意这里通过
npx命令启动 MCP Server,所以需要提前安装 Node.js,使用node --version确认你的电脑上是否具备 Node.js 环境。
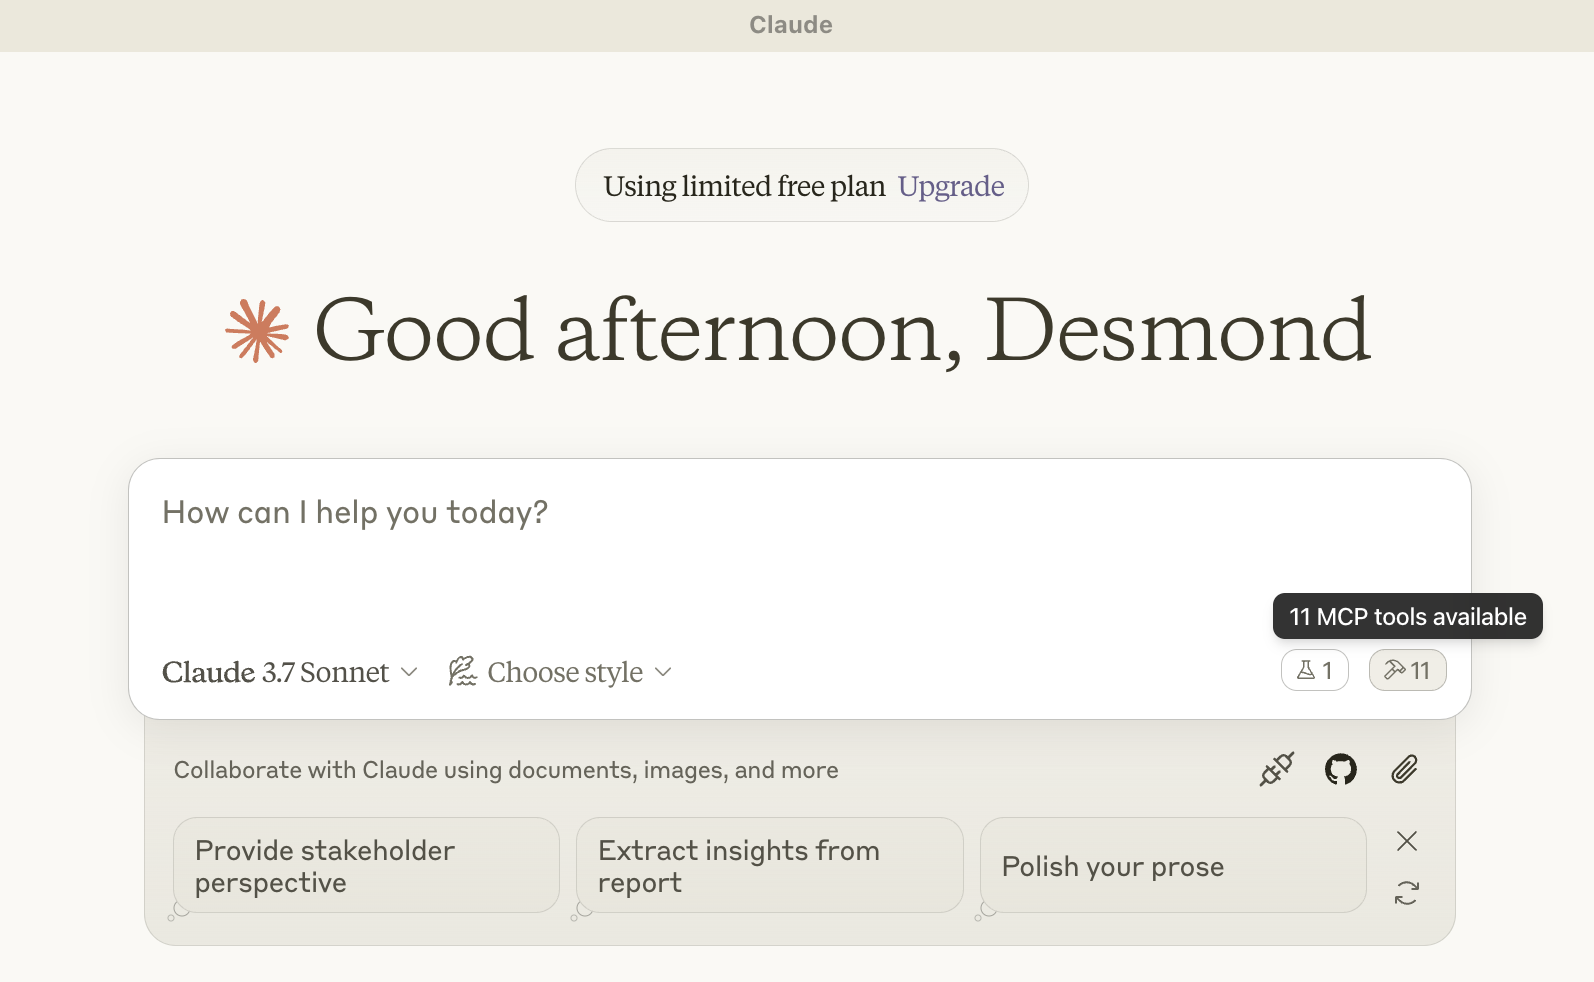
配置好 Filesystem MCP Server 之后,重启 Claude Desktop 应用,Claude Desktop 在启动时会自动加载所有的 MCP Server(其实就是为每个 Server 启动一个独立的进程,运行配置文件中的命令)。加载成功后,在对话框右下角会看到一个小锤子的图标:
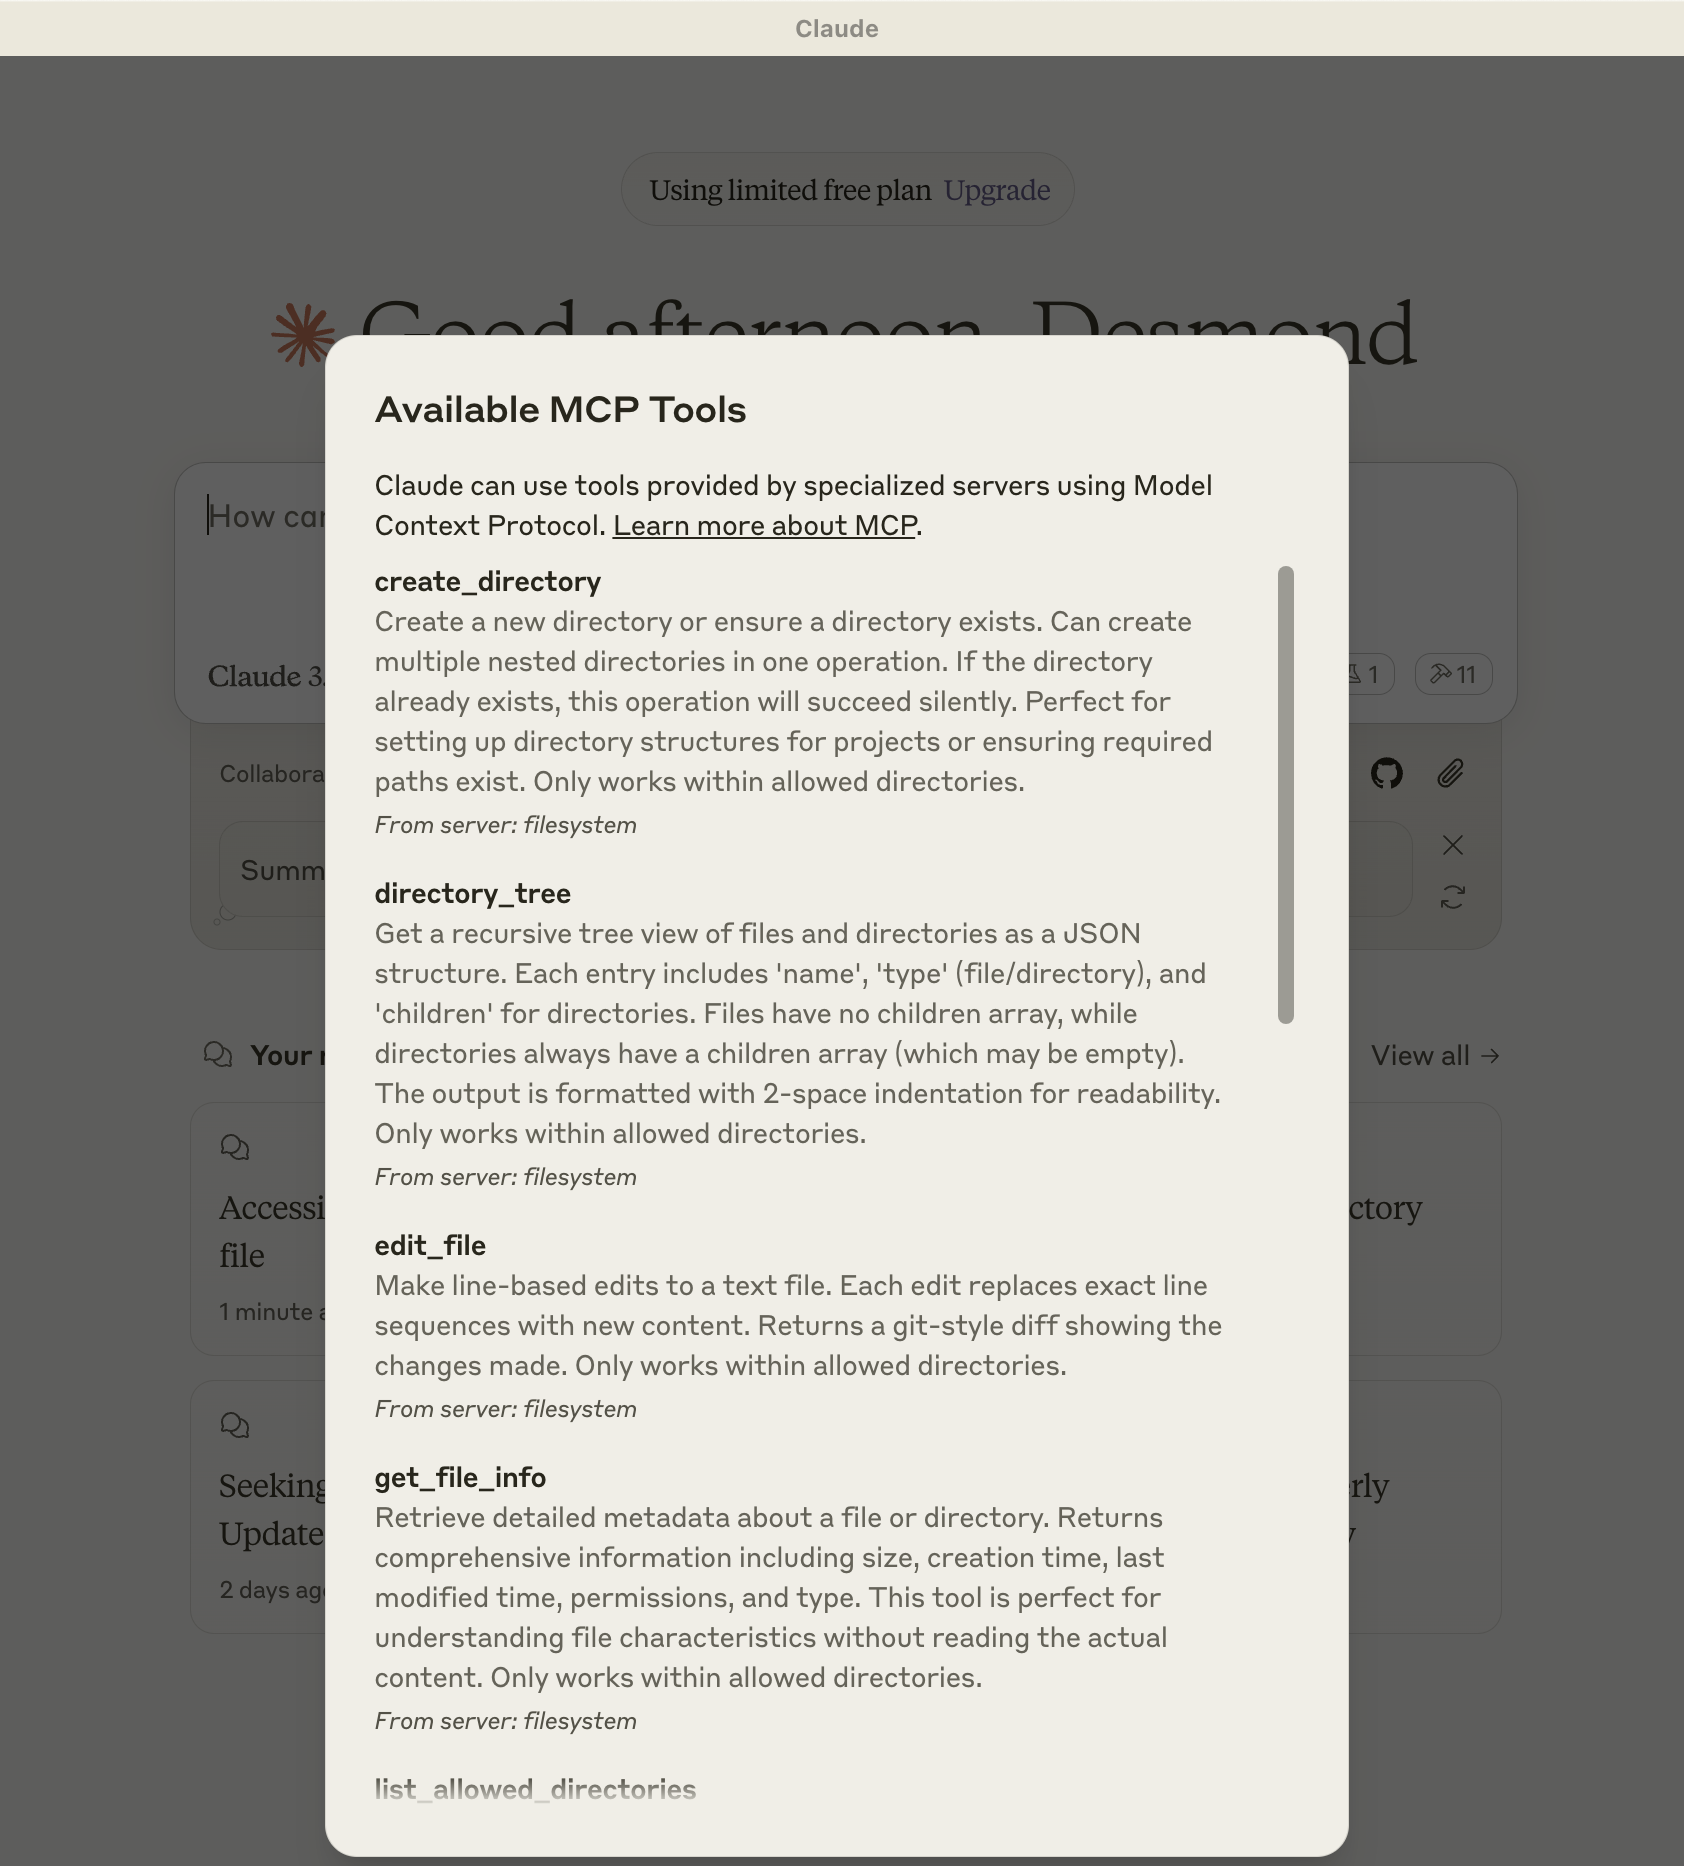
点击小图标,可以看到 Filesystem MCP Server 自带的所有工具列表:
这时我们就可以在对话时让 Claude 调用这些工具了:
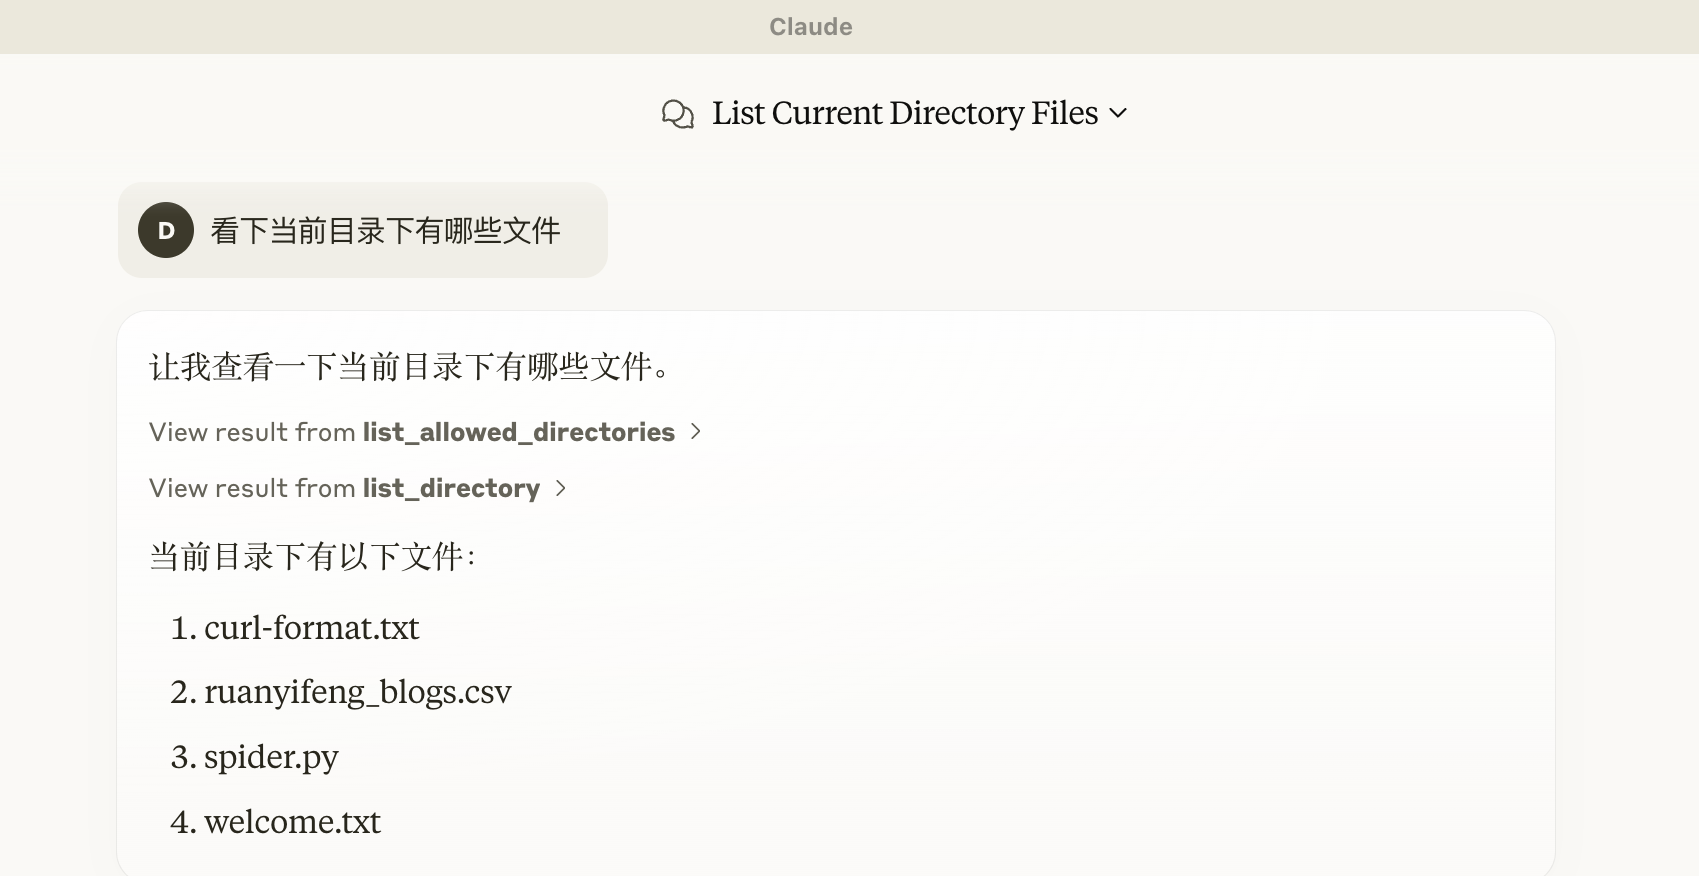
Claude 在调用工具之前会提醒用户,只有当用户确认允许后才会真正执行相应操作。
运行
npx默认是从 Node.js 官方仓库下载包,有时会非常慢,导致 Claude 加载 MCP Server 失败,可以通过环境变量将仓库地址改为国内的源: